RHEL :Linux(CH 1 to CH8)
#-->root user
$-->regular user
Web console is a system administration tool that provides a user interface for monitoring and administering servers through a web browser.
Web console enables to perform these tasks:
Monitoring basic system features, such as hardware, internet connection, or performance characteristics
Analyzing the content of the system log files
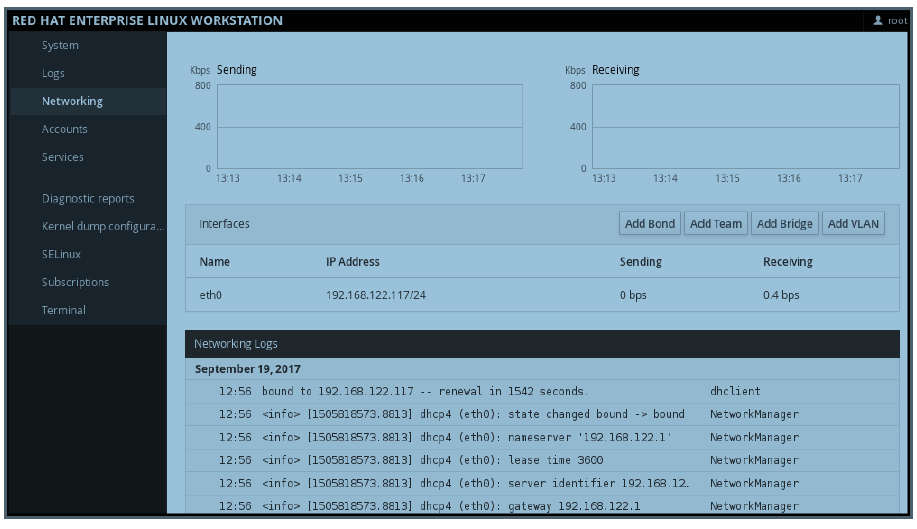
Configuring basic networking features, such as interfaces, network logs, packet sizes
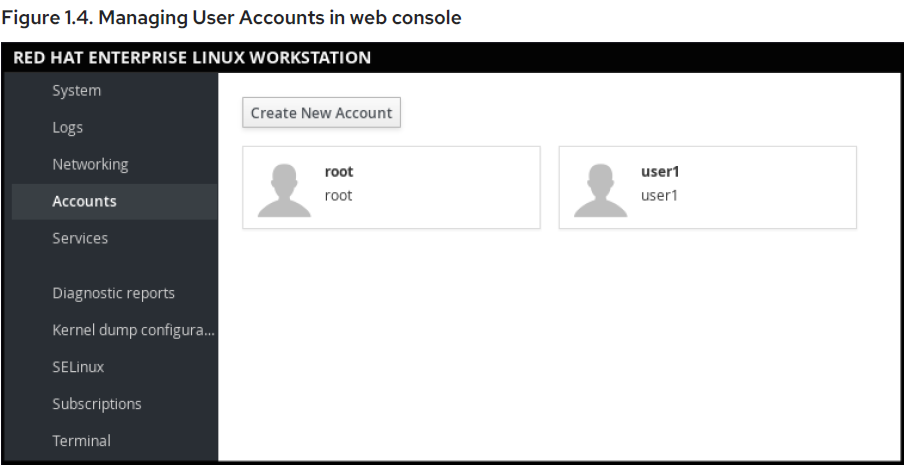
Managing user accounts
Monitoring and configuring system services
Creating diagnostic reports
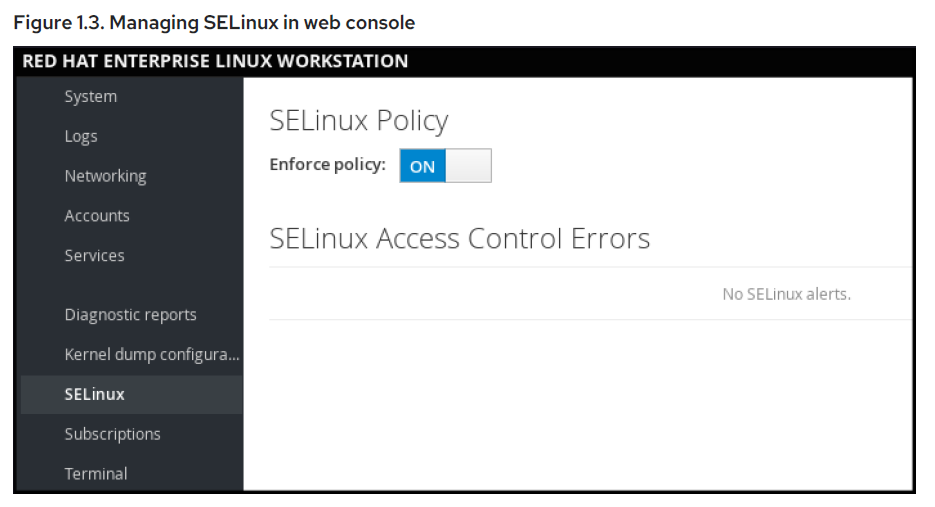
Setting kernel dump configuration Configuring SELinux
Managing system subscriptions
Accessing the terminal
Configuring the Date and Time:NTP protocol
chronyd The chronyd daemon is used by default. It is available from the chrony package.
ntpd The ntpd daemon is available from the ntp package.
Displaying the Current Date and Time:
~]$ date
~]$ timedatectl
Configuring the System Locale
System-wide locale settings are stored in the /etc/locale.conf file, which is read at early boot by the systemd daemon.
Listing available system locale settings:
~]$ localectl list-locales
Displaying current status of the system locales settings:
~]$ localectl status
Setting or changing the default system locale settings:
~]# localectl set-locale LANG=locale
Configuring the Keyboard Layout
Listing available keymaps:
~]$ localectl list-keymaps
Displaying current status of keymap settings:
~]$ localectl status
Setting or changing the default system keymap:
~]# localectl set-keymap
CONFIGURING AND INSPECTING NETWORK ACCESS: nmcli and nmutui
Managing Network Connections After the Installation Process Using :nmcli
To create a new connection:
~]# nmcli con add type type of the connection "con-name" connection name ifname ifname interfacename the name of the interface ipv4 address ipv4 address gw4 address gateway address
To modify the existing connection:
~]# nmcli con mod "con-name"
To display all connections:
~]# nmcli con show
To display the active connection:
~]# nmcli con show --active
To display all configuration settings of a particular connection:
~]# nmcli con show "con-name"
Using nmtui(NetworkManager text user interface (TUI) utility)
Managing Networking in web console
Registering the System after the Installation
Register your system:
~]# subscription-manager register
The command will prompt you to enter your Red Hat Customer Portal user name and password.
2. Determine the pool ID of a subscription that you require:
~]# subscription-manager list --available
This command displays all available subscriptions for your Red Hat account. For every subscription, various characteristics are displayed, including the pool ID.
3. Attach the appropriate subscription to your system by replacing pool_id with the pool ID determined in the previous step:
~]# subscription-manager attach --pool=pool_id
Registering a System to EUS Content
To access the Extended Update Support (EUS) content, register your system as follows:
Verify that EUS entitlements are available:
~]# subscription-manager list --available --matches="*Extended Update Support"Attach the applicable subscription using the Pool identifier:
~]# subscription-manager attach --pool 8a99f9ac7238188b01723d9c8a8a06a9Replace the default repositories enabled for the system with the EUS variants:
~]# subscription-manager repos --disable *Enable the repositories which represent the EUS content set for the RHEL revision in use:
~]# subscription-manager repos --enable rhel-7-server-eus-rpmsSelect the required and supported release for the end system:
~]# subscription-manager release --set 7.6
Registering a System to E4S Content
Register your system using the following command:
~]# subscription-manager registerVerify that E4S entitlements are available:
~]# subscription-manager list --available --matches="Update Services for SAP Solutions"
Attach the applicable subscription using the Pool identifier:
~]# subscription-manager attach --pool=#################Replace the default repositories enabled for the system with the EUS variants:
~]# subscription-manager repos --disable="*"Enable the repositories which represent the E4S content set for the RHEL revision in use:
~]# subscription-manager --enable=rhel-7-server-e4s-rpmsClear the repository cache and release lock the system to a valid release for E4S which supports your SAP application:
~]# yum clean all && subscription-manager release --set=7.7
INSTALLING SOFTWARE
When a system is subscribed to the Red Hat Content Delivery Network, a repository file is created in the /etc/yum.repos.d/ directory.
Use the yum utility to manage package operations:
1.Searching information about packages
2.Installing packages
3.Updating packages
4.Removing packages
5.Checking the list of currently available repositories
6.Adding or removing a repository
7.Enabling or disabling a repository
Managing Basic Software Installation Tasks with Subscription Manager and Yum
Listing all available repositories:
~]# subscription-manager repos --list
Listing all currently enabled repositories:
~]$ yum repolist
Enabling or disabling a repository:
~]# subscription-manager repos --enable repository
~]# subscription-manager repos --disable repository
Searching for packages matching a specific string:
~]$ yum search string
Installing a package:
~]# yum install package_name
Updating all packages and their dependencies:
~]# yum update
Updating a package:
~]# yum update package_name
Uninstalling a package and any packages that depend on it:
~]# yum remove package_name
Listing information on all installed and available packages:
~]$ yum list all
Listing information on all installed packages:
~]$ yum list installed
Enabling or Disabling the Services
~]# systemctl enableservice_name
~]# systemctl disableservice_name
What SELinux Is and How It Enhances System Security
Security Enhanced Linux (SELinux) is an additional layer of system security that determines which process can access which files, directories, and ports.
SELinux States SELinux has two possible states:
Enabled
Disabled
When SELinux is disabled, only Discretionary Access Control (DAC) rules are used.
SELinux Modes
When SELinux is enabled, it can run in one of the following modes:
Enforcing
Permissive
Enforcing mode means that SELinux policies is enforced.
SELinux denies access based on SELinux policy rules, and enables only the interactions that are particularly allowed.
Enforcing mode is the default mode after the installation and it is also the safest SELinux mode.
Permissive mode means that SELinux policies is not enforced.
SELinux does not deny access, but denials are logged for actions that would have been denied if running in enforcing mode.
Permissive mode is the default mode during the installation.
Ensuring the Required State of SELinux
Display the current SELinux mode in effect:
~]$ getenforce
2. If needed, switch between the SELinux modes. The switch can be either temporary or permanent. A temporary switch is not persistent across reboots, while permanent switch is. To temporary switch to either enforcing or permissive mode:
~]# setenforce Enforcing
~]# setenforce Permissive
To permanently set the SELinux mode, modify the SELINUX variable in the /etc/selinux/config configuration file.
Managing SELinux in web console
Secure Shell (SSH)
Secure Shell (SSH) is a protocol which facilitates client-server communication and allows users to log in to any host system running SSH remotely. SSH encrypts the connection. The client transmits its authentication information to the server using encryption, and all data sent and received during a session are transferred under the encryption.
Creating the Key Files and Copying Them to the Server
~]$ ssh-keygen
Both keys are stored in the
~/.ssh/ directory:
~/.ssh/id_rsa.pub - public key
~/.ssh/id_rsa - private key
Copy the most recently modified public key to a remote machine you want to log into:
~]# ssh-copy-id USER@hostname
Disabling SSH Root Login
Disabling SSH Root Login
Access the /etc/ssh/sshd_config file:
~]# vi /etc/ssh/sshd_configChange the line that reads
#PermitRootLogin yes <--to:--> PermitRootLogin no
Restart the sshd service:
~]# systemctl restart sshd
Most Basic Command-Line Tools to Manage User Accounts and Groups
Displaying user and group IDs:
~]# id
Creating a new user account:
~]# useradd [options] user_name
Assigning a new password to a user account belonging to username:
~]# passwd user_name
Adding a user to a group:
~]# usermod -a -G group_name user_name
Managing User Accounts in web console
What kdump Is and Which Tasks It Can Be Used
For In case of a system crash, you can use the Kernel crash dump mechanism called kdump that enables you to save the content of the system’s memory for later analysis.
The kdump mechanism relies on the kexec system call, which can be used to boot a Linux kernel from the context of another kernel, bypass BIOS, and preserve the contents of the first kernel’s memory that would otherwise be lost.
When kernel crash occurs, kdump uses kexec to boot into a second kernel (a capture kernel), which resides in a reserved part of the system memory that is inaccessible to the first kernel.
Ensuring That kdump Is Installed and Enabled
To check whether kdump is installed on your system:
~]$ rpm -q kexec-toolsIf not installed, to install kdump, enter as the root user:
~]# yum install kexec-toolsIf you need to install the graphical configuration tool:
~]# yum install system-config-kdump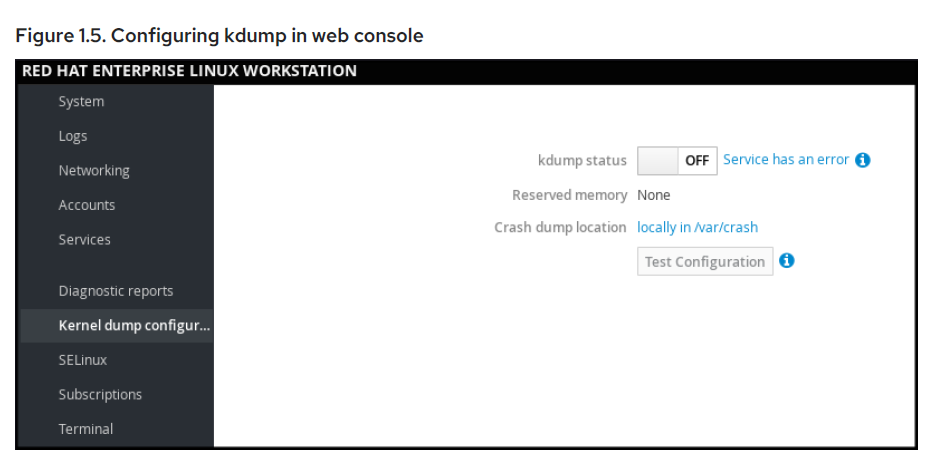
ReaR Is and Which Tasks It Can Be Used For
ReaR is a disaster recovery and system migration utility which enables you to create the complete rescue system.
ReaR enables to perform the following tasks:
Booting a rescue system on the new hardwareReplicating the original storage layoutRestoring user and system filesTo install ReaR, enter as the root user:
~]# yum install rear/etc/rear/local.conf file to configure ReaR.
Quickstart to Creation of the Rescue System with ReaR
~]# rear mkrescueTo make ReaR use its internal backup method, add these lines to the /etc/rear/local.conf file:
BACKUP=NETFS
BACKUP_URL=backup location
USING THE LOG FILES TO TROUBLESHOOT PROBLEMS
Services Handling the syslog Messages
The syslog messages are handled by two services:
the systemd-journald daemon -
Collects messages from the kernel,
the early stages of the boot process,
standard output and error of daemons as they start up and run, and syslog, and forwards the messages to the rsyslog service for further processing. the rsyslog service - Sorts the syslog messages by type and priority, and writes them to the files in the /var/log directory, where the logs are persistently stored.
Subdirectories Storing the syslog Messages The syslog
var/log/messages - all syslog messages except those mentioned below var/log/secure - security and authentication-related messages and errors var/log/maillog - mail server-related messages and errors var/log/cron - log files related to periodically executed tasks var/log/boot.log - log files related to system startup
CHAPTER 2. SYSTEM LOCALE AND KEYBOARD CONFIGURATION
Modifying the /etc/locale.conf configuration file or by using the localectl utility.
Option Description |
LANG Provides a default value for the system locale. |
LC_COLLATE Changes the behavior of functions which compare |
strings in the local alphabet. |
LC_CTYPE Changes the behavior of the character handling and |
classification functions and the multibyte character |
functions. |
LC_NUMERIC Describes the way numbers are usually printed, with |
details such as decimal point versus decimal comma. |
LC_TIME Changes the display of the current time, 24-hour |
versus 12-hour clock. |
LC_MESSAGES Determines the locale used for diagnostic messages |
written to the standard error output. |
Displaying the Current Status
localectl status
Listing Available Locales
localectl list-locales
Setting the Locale
To set the default system locale, use the following command as root:
localectl set-locale LANG=locale
Changing the Default Locale
~]# localectl set-locale LANG=en_GB.utf8
CHANGING THE KEYBOARD LAYOUT
localectl status
Listing Available Keymaps
localectl list-keymaps
Searching for a Particular Keymap
localectl list-keymaps | grep cz
Setting the Keymap
localectl set-keymap map
CHAPTER 3. CONFIGURING THE DATE AND TIME
The timedatectl utility, which is new in Red Hat Enterprise Linux 7 and is part of systemd.
The traditional date command.
The hwclock utility for accessing the hardware clock.
USING THE TIMEDATECTL COMMAND
Displaying the Current Date and Time
timedatectl
Network Time Protocol (NTP) configuration
~]# systemctl restart systemd-timedated.service
Changing the Current Time
To change the current time, type the following at a shell prompt as root:
timedatectl set-time HH:MM:SS
The result it is similar to using both the date --set and hwclock --systohc commands.
To configure your system to maintain the clock in the local time, run the timedatectl command with the set-local-rtc option as root:
timedatectl set-local-rtc boolean
Changing the Current Date
timedatectl set-time YYYY-MM-DD
Changing the Current Date
~]# timedatectl set-time "2017-06-02 23:26:00"
Changing the Time Zone
To list all available time zones, type the following at a shell prompt:
timedatectl list-timezones
To change the currently used time zone, type as root:
timedatectl set-timezone time_zone
To change the time zone to Europe/Prague, type as root:
~]# timedatectl set-timezone Europe/Prague
Synchronizing the System Clock with a Remote Server
the timedatectl command also allows you to enable automatic synchronization of your system clock with a group of remote servers.
timedatectl set-ntp boolean
~]# timedatectl set-ntp yes
USING THE DATE COMMAND
Displaying the Current Date and Time
date
date --utc
date --u
You can also customize the format of the displayed information by providing the +"format" option on the command line:
date +"format"
Commonly Used Control Sequences
Control Sequence Description |
%H The hour in the HH format (for example, 17). |
%M The minute in the MM format (for example, 30). |
%S The second in the SS format (for example, 24). |
%d The day of the month in the DD format (for example, |
16). |
%m The month in the MM format (for example, 09). |
%Y The year in the YYYY format (for example, 2016). |
%Z The time zone abbreviation (for example, CEST). |
%F The full date in the YYYY-MM-DD format (for |
example, 2016-09-16). This option is equal to %Y- |
%m-%d. |
%T The full time in the HH:MM:SS format (for exam |
Changing the Current Time
To change the current time, run the date command with the --set or -s option as root:
date --set HH:MM:SS
date --set HH:MM:SS --utc
Changing the Current Date
date --set YYYY-MM-DD
~]# date --set "2017-06-02 23:26:00"
USING THE HWCLOCK COMMAND
Displaying the Current Date and Time:hwclock
Setting the Date and Time
hwclock --set --date "dd mmm yyyy HH:MM"
Setting the Hardware Clock to a Specific Date and Time
~]# hwclock --set --date "21 Oct 2016 21:17" --utc
Synchronizing the Date and Time
hwclock --systohc
hwclock --hctosys
Synchronizing the Hardware Clock with System Time
~]# hwclock --systohc --localtime
CHAPTER 4. MANAGING USERS AND GROUPS
Each user is associated with a unique numerical identification number called a user ID (UID). Likewise, each group is associated with a group ID (GID).
Reserved User and Group IDs
cat /usr/share/doc/setup*/uidgid
/etc/login.defs
A list of all groups is stored in the /etc/group configuration file.
Shadow Passwords
In environments with multiple users, it is very important to use shadow passwords provided by the shadow-utils package to enhance the security of system authentication files.
Shadow passwords improve system security by moving encrypted password hashes from the world-readable /etc/passwd file to /etc/shadow, which is readable only by the root user.
The gpasswd utility for administrating the /etc/group file.
The usermod command with the -e, --expiredate or -f, --inactive option.
The useradd command with the -e, --expiredate or -f, --inactive option
The Super key appears in a variety of guises, depending on the keyboard
USING COMMAND-LINE TOOLS
Utilities | Description |
id | Displays user and group IDs. |
useradd, usermod, userdel | Standard utilities for adding, modifying, and deleting user accounts. |
groupadd, groupmod, groupdel | Standard utilities for adding, modifying, and deleting groups. |
gpasswd | Utility primarily used for modification of group password in the /etc/gshadow file which is used by the newgrp command. |
pwck, grpck | Utilities that can be used for verification of thepassword, group, and associated shadow files. |
pwconv, pwunconv | Utilities that can be used for the conversion of passwords to shadow passwords, or back from shadow passwords to standard passwords. |
grpconv, grpunconv Similar to the previous, these utilities can be used for conversion of shadowed information for group accounts.
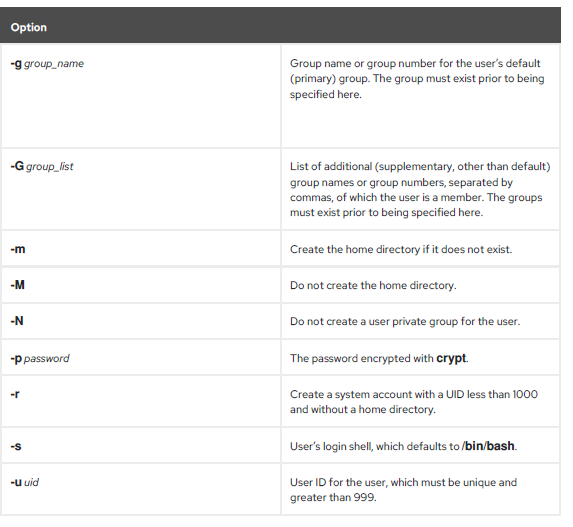
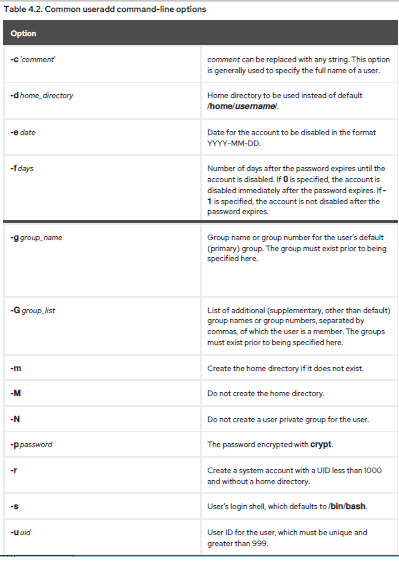
Adding a New User
useradd options username
passwd username(adding password to username)
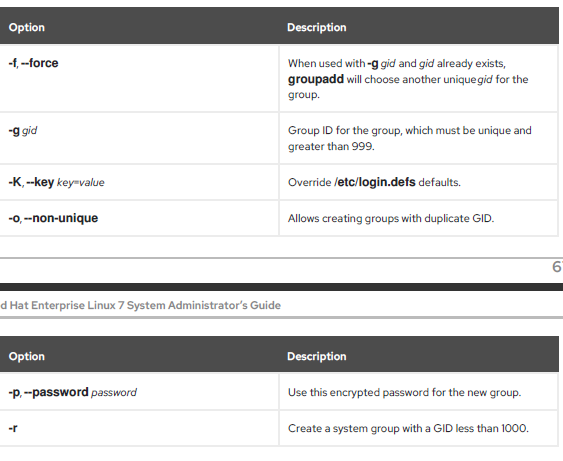
Adding a New Group
Adding an Existing User to an Existing Group
To override user’s primary group, run the following command as root:
~]# usermod -g group_name user_name
To override user’s supplementary groups, run the following command as root:
~]# usermod -G group_name1,group_name2,... user_name
Note that in this case all previous supplementary groups of the user are replaced by the new group or several new groups.
To add one or more groups to user’s supplementary groups, run one of the following commands as root:
~]# usermod -aG group_name1,group_name2,... user_name
~]# usermod --append -G group_name1,group_name2,... user_name
Creating Group Directories
As root, create the /opt/myproject/ directory by typing the following at a shell prompt:
mkdir /opt/myproject
2. Add the myproject group to the system:
groupadd myproject
3. Associate the contents of the /opt/myproject/ directory with the myproject group:
chown root:myproject /opt/myproject
4. Allow users in the group to create files within the directory and set the setgid bit:
chmod 2775 /opt/myproject
At this point, all members of the myproject group can create and edit files in the /opt/myproject/ directory without the administrator having to change file permissions every time users write new files. To verify that the permissions have been set correctly, run the following command:
~]# ls -ld /opt/myproject
5. Add users to the myproject group:
usermod -aG myproject username
Setting Default Permissions for New Files Using umask
-rw-rw-r--
bash has umask 0022 by default
A umask consists of bits corresponding to standard file permissions. For example, for umask 0137,
the digits mean that: 0 = no meaning, it is always 0 (umask does not affect special bits)
1 = for owner permissions, the execute bit is set
3 = for group permissions, the execute and write bits are set
7 = for others permissions, the execute, write, and read bits are set
Displaying the current mask :
 ~]$ umask
To show the current umask in symbolic notation:
~]$ umask -S
To set umask for the current shell session using octal notation run:
~]$ umask octal_mask
Setting umask Using Octal Notation
~]$ umask 0337
To set umask for the current shell session using symbolic notation:
~]$ umask -S symbolic_mask
Setting umask Using Symbolic Notation
~]$ umask -S u=r,g=r,o=
Shells usually have a configuration file where their default umask is set. For bash, it is /etc/bashrc. To
show the default bash umask:
~]$ grep -i -B 1 umask /etc/bashrc
The output shows if umask is set, either using the umask command or the UMASK variable. In the
following example, umask is set to 022 using the umask command:
~]$ grep -i -B 1 umask /etc/bashrc
# By default, we want umask to get set. This sets it for non-login shell.
--
if [ $UID -gt 199 ] && [ “id -gn” = “id -un” ]; then
umask 002
else
umask 022
To change the default umask for bash, change the umask command call or the UMASK variable
assignment in /etc/bashrc. This example changes the default umask to 0227:
if [ $UID -gt 199 ] && [ “id -gn” = “id -un” ]; then
CHAPTER 4. MANAGING USERS AND GROUPS
71
umask 002
else
umask 227
Working with the default shell umask of a specific user
By default, bash umask of a new user defaults to the one defined in /etc/bashrc.
To change bash umaskfor a particular user, add a call to the umask command in $HOME/.bashrc file of
that user. For example, to change bash umask of user john to 0227:
john@server ~]$ echo 'umask 227' >> /home/john/.bashrc
Setting default permissions for newly created home directories
To change permissions with which user home directories are created, change the UMASK variable in the
/etc/login.defs file:
# The permission mask is initialized to this value. If not specified,
# the permission mask will be initialized to 022.
UMASK 077
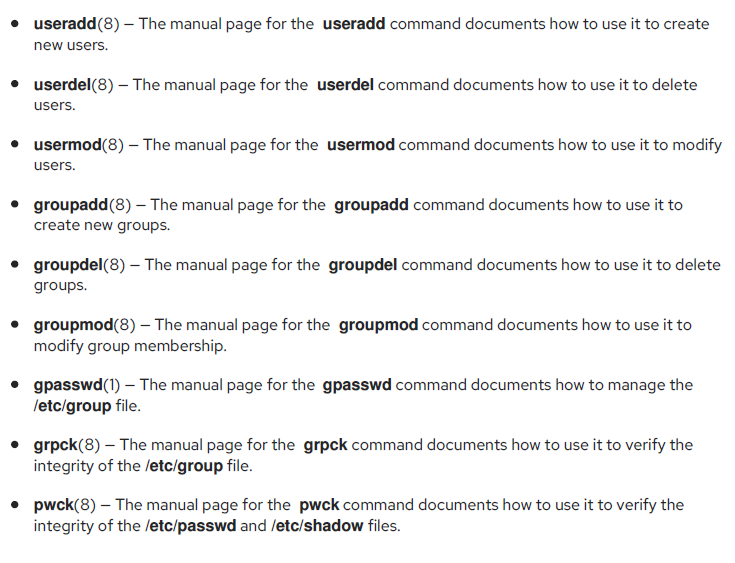
ADDITIONAL RESOURCES
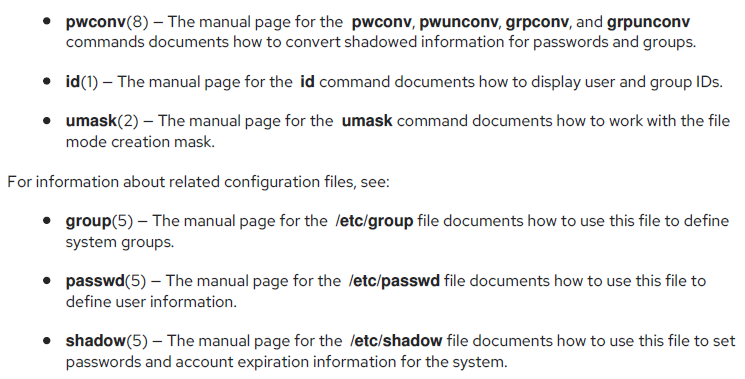
CHAPTER 5. ACCESS CONTROL LISTS
Along with support in the kernel, the acl package is required to implement ACLs. It contains the utilities used to add, modify, remove, and retrieve ACL information. The cp and mv commands copy or move any ACLs associated with files and directories.
MOUNTING FILE SYSTEMS
mount -t ext3 -o acl device-name partition
For example:
mount -t ext3 -o acl /dev/VolGroup00/LogVol02 /work
NFS By default, if the file system being exported by an NFS server supports ACLs and the NFS client can read ACLs, ACLs are utilized by the client system.
To disable ACLs on NFS shares when configuring the server, include the no_acl option in the /etc/exports file.
To disable ACLs on an NFS share when mounting it on a client, mount it with the no_acl option via the command line or the /etc/fstab file.
SETTING ACCESS ACLS
There are two types of ACLs: access ACLs and default ACLs. An access ACL is the access control list for a specific file or directory. A default ACL can only be associated with a directory; if a file within the directory does not have an access ACL, it uses the rules of the default ACL for the directory. Default ACLs are optional.
ACLs can be configured:
Per user
Per group
Via the effective rights mask
For users not in the user group for the file
The setfacl utility sets ACLs for files and directories. Use the -m option to add or modify the ACL of a file or directory:
setfacl -m rules files
Note:Multiple rules can be specified in the same command if they are separated by commas.
u:uid:perms
Sets the access ACL for a user. The user name or UID may be specified. The user may be any valid
user on the system.
g:gid:perms
Sets the access ACL for a group. The group name or GID may be specified. The group may be any
valid group on the system.
m:perms
Sets the effective rights mask. The mask is the union of all permissions of the owning group and all of
the user and group entries.
o:perms
Sets the access ACL for users other than the ones in the group for the file.
Permissions (perms) must be a combination of the characters r, w, and x for read, write, and execute.
Give read and write permissions For example, to give read and write permissions to user andrius:
setfacl -m u:andrius:rw /project/somefile
To remove all the permissions for a user, group, or others, use the -x option and do not specify any permissions:
setfacl -x rules files
Remove all permissions
For example, to remove all permissions from the user with UID 500:
setfacl -x u:500 /project/somefile
Setting default ACLs For example,
to set the default ACL for the /share/ directory to read and execute for users not in the user group (an access ACL for an individual file can override it):
setfacl -m d:o:rx /share
Retrieving ACLs
getfacl home/john/picture.png
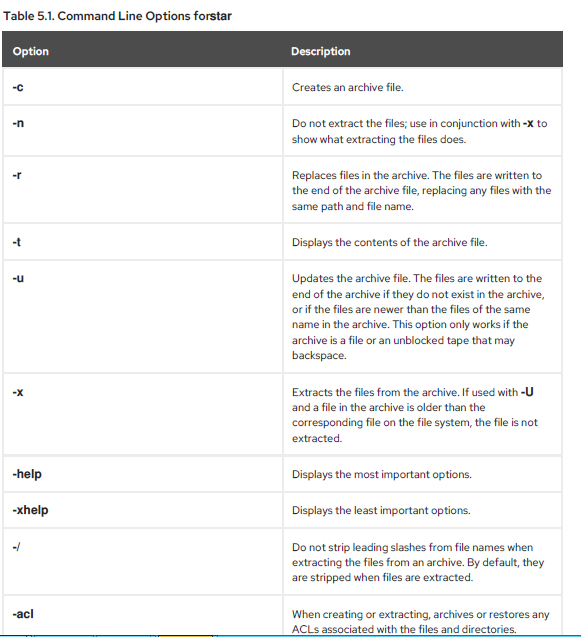
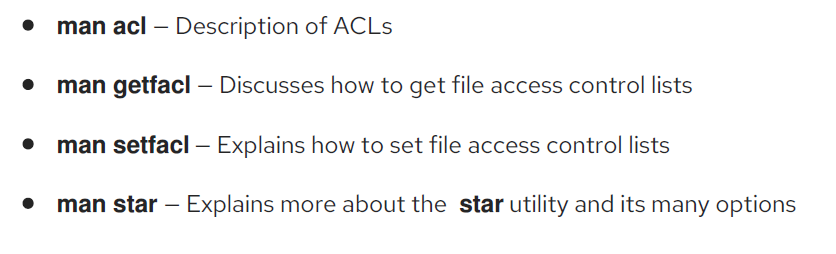
ARCHIVING FILE SYSTEMS WITH ACLS
CHAPTER 6. GAINING PRIVILEGES
One of the simplest ways to do this is to add users to the special administrative group called wheel. To do this, type the following command as root: ~]#
usermod -a -G wheel username
You can also configure sudo users who do not need to provide any password by using the NOPASSWD option in the /etc/sudoers file:
user_name ALL=(ALL) NOPASSWD: ALL
sudo /bin/bash
ADDITIONAL RESOURCES
su(1) — The manual page for su provides information regarding the options available with this command.
sudo(8) — The manual page for sudo includes a detailed description of this command and lists options available for customizing its behavior.
pam(8) — The manual page describing the use of Pluggable Authentication Modules (PAM) for Linux.
REGISTERING THE SYSTEM AND MANAGING SUBSCRIPTIONS
Run the following command to register your system. You will be prompted to enter your user name and password. Note that the user name and password are the same as your login credentials for Red Hat Customer Portal.
subscription-manager register
Determine the pool ID of a subscription that you require. To do so, type the following at a shell prompt to display a list of all subscriptions that are available for your system:
subscription-manager list --available
Attach the appropriate subscription to your system by entering a command as follows:
subscription-manager attach --pool=pool_id
To verify the list of subscriptions your system has currently attached, at any time, run:
subscription-manager list --consumed
MANAGING SOFTWARE REPOSITORIES
To verify that, use yum to list all enabled repositories:
 yum repolist
To list all available repositories, use the following command:
subscription-manager repos --list
rhel-version-variant-rpms
rhel-version-variant-debug-rpms
rhel-version-variant-source-rpms
To enable a repository, enter a command as follows:
subscription-manager repos --enable repository
to disable a repository, use the following command:
subscription-manager repos --disable repository
Enter a command as follows to remove the selected subscription:
subscription-manager remove --serial=serial_number
To remove all subscriptions attached to the system, run the following command: /
subscription-manager remove --all
CHAPTER 8. ACCESSING SUPPORT USING THE RED HAT SUPPORT TOOL
INSTALLING THE RED HAT SUPPORT TOOL
~]# yum install redhat-support-tool
REGISTERING THE RED HAT SUPPORT TOOL USING THE COMMAND LINE
~]# redhat-support-tool config user username
Where username is the user name of the Red Hat Customer Portal account.
~]# redhat-support-tool config password
Please enter the password for username:
USING THE RED HAT SUPPORT TOOL IN INTERACTIVE SHELL MODE
To start the tool in interactive mode, enter the following command:
~]$ redhat-support-tool
CONFIGURING THE RED HAT SUPPORT TOOL
config --help
- config user
- config user my-rhn-username
- config --unset user
Registering the Red Hat Support Tool Using Interactive Mode
1.Start the tool by entering the following command:
~]# redhat-support-tool
2. Enter your Red Hat Customer Portal user name:

Command (? for help): config user username
To save your user name to the global configuration file, add the -g option.

3. Enter your Red Hat Customer Portal password:

Command (? for help): config password
Please enter the password for username:
~/.redhat-support-tool/redhat-support-tool.conf
config setting -g value
In order to be able to save settings globally, using the -g, --global option, the Red Hat Support Tool must be run as root because normal users do not have the permissions required to write to /etc/redhat-support-tool.conf.
config setting -u value
PART III. INSTALLING AND MANAGING SOFTWARE