Setting up the Apache HTTP web server
Features include:
HTTP/2support is now provided by themod_http2package, which is a part of thehttpdmodule.systemd socket activation is supported. See
httpd.socket(8)man page for more details.Multiple new modules have been added:
mod_proxy_hcheck- a proxy health-check modulemod_proxy_uwsgi- a Web Server Gateway Interface (WSGI) proxymod_proxy_fdpass- provides support for the passing the socket of the client to another processmod_cache_socache- an HTTP cache using, for example, memcache backendmod_md- an ACME protocol SSL/TLS certificate service
The following modules now load by default:
mod_requestmod_macromod_watchdog
A new subpackage,
httpd-filesystem, has been added, which contains the basic directory layout for the Apache HTTP Server including the correct permissions for the directories.Instantiated service support,
httpd@.servicehas been introduced. See thehttpd.serviceman page for more information.A new
httpd-init.servicereplaces the%post scriptto create a self-signedmod_sslkey pair.Automated TLS certificate provisioning and renewal using the Automatic Certificate Management Environment (ACME) protocol is now supported with the
mod_mdpackage (for use with certificate providers such asLet’s Encrypt).The Apache HTTP Server now supports loading TLS certificates and private keys from hardware security tokens directly from
PKCS#11modules. As a result, amod_sslconfiguration can now usePKCS#11URLs to identify the TLS private key, and, optionally, the TLS certificate in theSSLCertificateKeyFileandSSLCertificateFiledirectives.A new
ListenFreedirective in the/etc/httpd/conf/httpd.conffile is now supported.Similarly to the
Listendirective,ListenFreeprovides information about IP addresses, ports, or IP address-and-port combinations that the server listens to. However, withListenFree, theIP_FREEBINDsocket option is enabled by default. Hence,httpdis allowed to bind to a nonlocal IP address or to an IP address that does not exist yet. This allowshttpdto listen on a socket without requiring the underlying network interface or the specified dynamic IP address to be up at the time whenhttpdis trying to bind to it.
Updating the configuration
You can check the configuration for possible errors by using the following command:
# apachectl configtest
Syntax OK
The httpd service configuration files
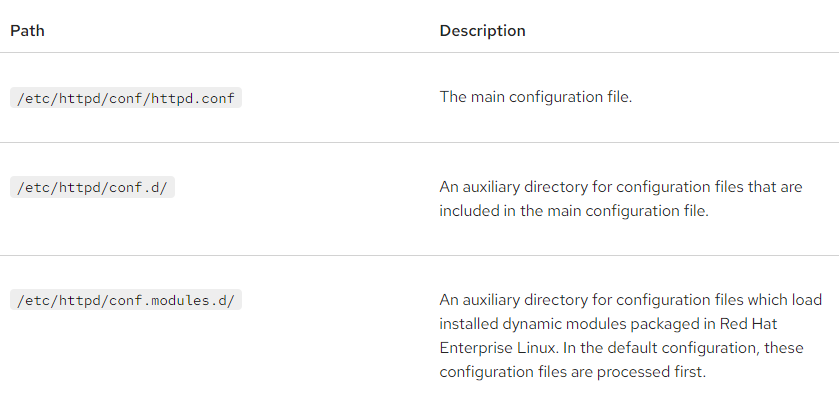
To check the configuration for possible errors, type the following at a shell prompt:
# apachectl configtest
Syntax OK
To make the recovery from mistakes easier, make a copy of the original file before editing it.
Managing the httpd service
This section describes how to start, stop, and restart the httpd service.
Prerequisites
- The Apache HTTP Server is installed.
Procedure
To start the
httpdservice, enter:# systemctl start httpdTo stop the
httpdservice, enter:# systemctl stop httpdTo restart the
httpdservice, enter:# systemctl restart httpdSetting up a single-instance Apache HTTP Server
Install the
httpdpackage:# yum install httpd or dnf install httpdIf you use
firewalld, open the TCP port80in the local firewall:# firewall-cmd --permanent --add-port=80/tcp # firewall-cmd --reloadEnable and start the
httpdservice:# systemctl enable --now httpdOptional: Add HTML files to the
/var/www/html/directory.Connect with a web browser to
http://server_IP_or_host_name/.
Configuring Apache name-based virtual hosts
Prerequisites
Clients and the web server resolve the
example.comandexample.netdomain to the IP address of the web server.Note that you must manually add these entries to your DNS server.
Procedure
Install the
httpdpackage:# yum install httpdEdit the
/etc/httpd/conf/httpd.conffile:Append the following virtual host configuration for the
example.comdomain:<VirtualHost *:80> DocumentRoot "/var/www/example.com/" ServerName example.com CustomLog /var/log/httpd/example.com_access.log combined ErrorLog /var/log/httpd/example.com_error.log </VirtualHost>These settings configure the following:
All settings in the
<VirtualHost *:80>directive are specific for this virtual host.DocumentRootsets the path to the web content of the virtual host.ServerNamesets the domains for which this virtual host serves content.To set multiple domains, add the
ServerAliasparameter to the configuration and specify the additional domains separated with a space in this parameter.CustomLogsets the path to the access log of the virtual host.ErrorLogsets the path to the error log of the virtual host.Append a similar virtual host configuration for the
example.netdomain:<VirtualHost *:80> DocumentRoot "/var/www/example.net/" ServerName example.net CustomLog /var/log/httpd/example.net_access.log combined ErrorLog /var/log/httpd/example.net_error.log </VirtualHost>Create the document roots for both virtual hosts:
  # mkdir /var/www/example.com/
  # mkdir /var/www/example.net/
If you set paths in the
DocumentRootparameters that are not within/var/www/, set thehttpd_sys_content_tcontext on both document roots:# semanage fcontext -a -t httpd_sys_content_t "/srv/example.com(/.*)?" # restorecon -Rv /srv/example.com/ # semanage fcontext -a -t httpd_sys_content_t "/srv/example.net(/.\*)?" # restorecon -Rv /srv/example.net/These commands set the
httpd_sys_content_tcontext on the/srv/example.com/and/srv/example.net/directory.Note that you must install the
policycoreutils-python-utilspackage to run therestoreconcommand.If you use
firewalld, open port80in the local firewall:# firewall-cmd --permanent --add-port=80/tcp # firewall-cmd --reloadEnable and start the
httpdservice:# systemctl enable --now httpd
Verification steps
Create a different example file in each virtual host’s document root:
 # echo "vHost example.com" > /var/www/example.com/index.html
 # echo "vHost example.net" > /var/www/example.net/index.html
Use a browser and connect to
http://example.com. The web server shows the example file from theexample.comvirtual host.Use a browser and connect to
http://example.net. The web server shows the example file from theexample.netvirtual host.
ADDITIONAL RESOURCES
Configuring Kerberos authentication for the Apache HTTP web server
Note
The mod_auth_gssapi module replaces the removed mod_auth_kerb module.
Prerequisites
The
httpdandgssproxypackages are installed.The Apache web server is set up and the
httpdservice is running.
Setting up GSS-Proxy in an IdM environment
Procedure
Enable access to the
keytabfile of HTTP/<SERVER_NAME>@realm principal by creating the service principal:# ipa service-add HTTP/<SERVER_NAME>Retrieve the
keytabfor the principal stored in the/etc/gssproxy/http.keytabfile:# ipa-getkeytab -s $(awk '/^server =/ {print $3}' /etc/ipa/default.conf) -k /etc/gssproxy/http.keytab -p HTTP/$(hostname -f)This step sets permissions to 400, thus only the
rootuser has access to thekeytabfile. Theapacheuser does not.Create the
/etc/gssproxy/80-httpd.conffile with the following content:[service/HTTP] mechs = krb5 cred_store = keytab:/etc/gssproxy/http.keytab cred_store = ccache:/var/lib/gssproxy/clients/krb5cc_%U euid = apacheRestart and enable the
gssproxyservice:# systemctl restart gssproxy.service # systemctl enable gssproxy.service
ADDITIONAL RESOURCES
gssproxy(8)man pagesgssproxy-mech(8)man pagesgssproxy.conf(5)man pages
1.8.2. Configuring Kerberos authentication for a directory shared by the Apache HTTP web server
This procedure describes how to configure Kerberos authentication for the /var/www/html/private/ directory.
Prerequisites
- The
gssproxyservice is configured and running.
Procedure
Configure the
mod_auth_gssapimodule to protect the/var/www/html/private/directory:<Location /var/www/html/private> AuthType GSSAPI AuthName "GSSAPI Login" Require valid-user </Location>Create the
/etc/systemd/system/httpd.servicefile with the following content:.include /lib/systemd/system/httpd.service [Service] Environment=GSS_USE_PROXY=1Reload the
systemdconfiguration:# systemctl daemon-reloadRestart the
httpdservice:# systemctl restart httpd.service
Verification steps
Obtain a Kerberos ticket:
# kinitOpen the URL to the protected directory in a browser.
1.9. Configuring TLS encryption on an Apache HTTP Server
By default, Apache provides content to clients using an unencrypted HTTP connection. This section describes how to enable TLS encryption and configure frequently used encryption-related settings on an Apache HTTP Server.
Prerequisites
- The Apache HTTP Server is installed and running.
Adding TLS encryption to an Apache HTTP Server
Procedure
Install the
mod_sslpackage:# yum install mod_sslEdit the
/etc/httpd/conf.d/ssl.conffile and add the following settings to the<VirtualHost _default_:443>directive:Set the server name:
ServerName example.comImportant
The server name must match the entry set in the
Common Namefield of the certificate.Optional: If the certificate contains additional host names in the
Subject Alt Names(SAN) field, you can configuremod_sslto provide TLS encryption also for these host names. To configure this, add theServerAliasesparameter with corresponding names:ServerAlias www.example.com server.example.comSet the paths to the private key, the server certificate, and the CA certificate:
 SSLCertificateKeyFile "/etc/pki/tls/private/example.com.key"
 SSLCertificateFile "/etc/pki/tls/certs/example.com.crt"
 SSLCACertificateFile "/etc/pki/tls/certs/ca.crt"
For security reasons, configure that only the
rootuser can access the private key file:# chown root:root /etc/pki/tls/private/example.com.key # chmod 600 /etc/pki/tls/private/example.com.keyWarning
If the private key was accessed by unauthorized users, revoke the certificate, create a new private key, and request a new certificate. Otherwise, the TLS connection is no longer secure.
If you use
firewalld, open port443in the local firewall:# firewall-cmd --permanent --add-port=443/tcp # firewall-cmd --reloadRestart the
httpdservice:# systemctl restart httpdNote
If you protected the private key file with a password, you must enter this password each time when the
httpdservice starts.
Verification steps
- Use a browser and connect to
https://example.com.
ADDITIONAL RESOURCES
Setting the supported TLS protocol versions on an Apache HTTP Server
Procedure
Edit the
/etc/httpd/conf/httpd.conffile, and add the following setting to the<VirtualHost>directive for which you want to set the TLS protocol version. For example, to enable only theTLSv1.3protocol:SSLProtocol -All TLSv1.3Restart the
httpdservice:# systemctl restart httpd
Verification steps
Use the following command to verify that the server supports
TLSv1.3:# openssl s_client -connect example.com:443 -tls1_3Use the following command to verify that the server does not support
TLSv1.2:# openssl s_client -connect example.com:443 -tls1_2If the server does not support the protocol, the command returns an error:
140111600609088:error:1409442E:SSL routines:ssl3_read_bytes:tlsv1 alert protocol version:ssl/record/rec_layer_s3.c:1543:SSL alert number 70Optional: Repeat the command for other TLS protocol versions.
Setting the supported ciphers on an Apache HTTP Server
Procedure
Edit the
/etc/httpd/conf/httpd.conffile, and add theSSLCipherSuiteparameter to the<VirtualHost>directive for which you want to set the TLS ciphers:SSLCipherSuite "EECDH+AESGCM:EDH+AESGCM:AES256+EECDH:AES256+EDH:!SHA1:!SHA256"This example enables only the
EECDH+AESGCM,EDH+AESGCM,AES256+EECDH, andAES256+EDHciphers and disables all ciphers which use theSHA1andSHA256message authentication code (MAC).Restart the
httpdservice:# systemctl restart httpd
Verification steps
To display the list of ciphers the Apache HTTP Server supports:
Install the
nmappackage:# yum install nmapUse the
nmaputility to display the supported ciphers:# nmap --script ssl-enum-ciphers -p 443 example.com ... PORT STATE SERVICE 443/tcp open https | ssl-enum-ciphers: | TLSv1.2: | ciphers: | TLS_ECDHE_RSA_WITH_AES_256_GCM_SHA384 (ecdh_x25519) - A | TLS_DHE_RSA_WITH_AES_256_GCM_SHA384 (dh 2048) - A | TLS_ECDHE_RSA_WITH_CHACHA20_POLY1305_SHA256 (ecdh_x25519) - A ...
Procedure
Edit the
/etc/httpd/conf/httpd.conffile, and add theSSLCipherSuiteparameter to the<VirtualHost>directive for which you want to set the TLS ciphers:SSLCipherSuite "EECDH+AESGCM:EDH+AESGCM:AES256+EECDH:AES256+EDH:!SHA1:!SHA256"This example enables only the
EECDH+AESGCM,EDH+AESGCM,AES256+EECDH, andAES256+EDHciphers and disables all ciphers which use theSHA1andSHA256message authentication code (MAC).Restart the
httpdservice:# systemctl restart httpd
Verification steps
To display the list of ciphers the Apache HTTP Server supports:
Install the
nmappackage:# yum install nmapUse the
nmaputility to display the supported ciphers:# nmap --script ssl-enum-ciphers -p 443 example.com ... PORT STATE SERVICE 443/tcp open https | ssl-enum-ciphers: | TLSv1.2: | ciphers: | TLS_ECDHE_RSA_WITH_AES_256_GCM_SHA384 (ecdh_x25519) - A | TLS_DHE_RSA_WITH_AES_256_GCM_SHA384 (dh 2048) - A | TLS_ECDHE_RSA_WITH_CHACHA20_POLY1305_SHA256 (ecdh_x25519) - A ...
Prerequisites
Procedure
Edit the
/etc/httpd/conf/httpd.conffile and add the following settings to the<VirtualHost>directive for which you want to configure client authentication:<Directory "/var/www/html/Example/"> SSLVerifyClient require </Directory>The
SSLVerifyClient requiresetting defines that the server must successfully validate the client certificate before the client can access the content in the/var/www/html/Example/directory.Restart the
httpdservice:# systemctl restart httpd
Verification steps
Use the
curlutility to access thehttps://example.com/Example/URL without client authentication:$ curl https://example.com/Example/ curl: (56) OpenSSL SSL_read: error:1409445C:SSL routines:ssl3_read_bytes:tlsv13 **alert certificate required**, errno 0The error indicates that the web server requires a client certificate authentication.
Pass the client private key and certificate, as well as the CA certificate to
curlto access the same URL with client authentication:$ curl --cacert ca.crt --key client.key --cert client.crt https://example.com/Example/If the request succeeds,
curldisplays theindex.htmlfile stored in the/var/www/html/Example/directory.