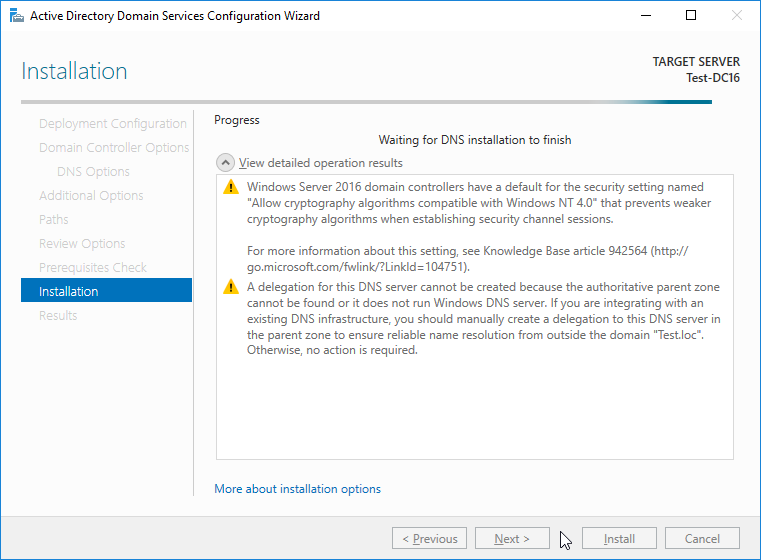
Windows :ADDS(Active Directory Domain Service)
What is Active Directory?
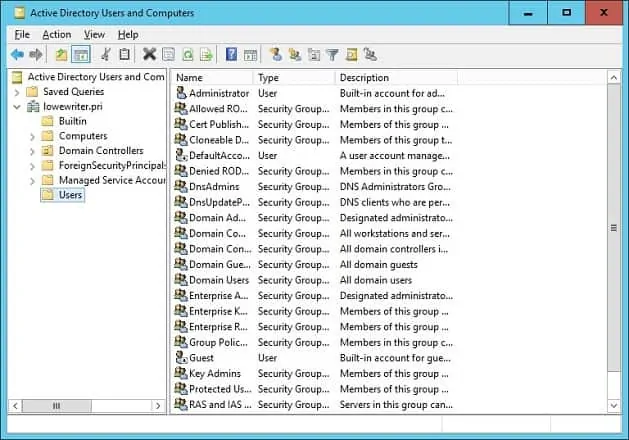
Active Directory is a directory service or container which stores data objects on your local network environment. The service records data on users, devices, applications, groups, and devices in a hierarchical structure.
Active Directory enables users to log on to and manage a variety of resources from one location. Login credentials are unified so that it is easier to manage multiple devices without having to enter account details to access each individual machine.
Network administrators turn to AD for these main strengths:
User Management: AD provides a centralized directory for creating, managing, and securing user accounts and groups within an organization.
Authentication: AD verifies the identity of users and computers in a Windows domain.
Authorization: AD manages user permissions, determining who gets access to which resources and what actions they can perform.
Domain Services: AD structures your network resources, allowing for efficient organization, management, and search of resources within a domain.
Policy Enforcement: AD allows administrators to enforce security and policies across the network through Group Policy Objects (GPOs).
How to Setup Active Directory (with RSAT)
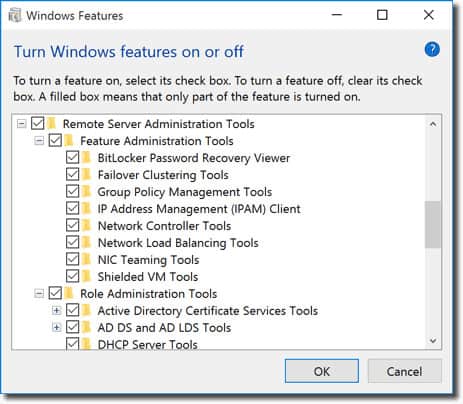
For Windows 10 Version 1809 and Windows 11:
Right-click on the Start button and go to Settings > Apps > Manage optional features > Add feature.
Now select RSAT: Active Directory Domain Services and Lightweight Directory Tools.
Finally, select Install then go to Start > Windows Administrative Tools to access Active Directory once the installation is complete.
How to use Active Directory: How to Setup a Domain Controller, Creating Directory Users
A domain controller is a central computer that will respond to authentication requests and authenticate other computers throughout the network. The domain controller stores the login credentials of all other computers and printers.
All other computers connect to the domain controller so that the user can authenticate every device from one location. The advantage of this is that the administrator won’t have to manage dozens of login credentials.
The process of setting up a domain controller is relatively simple. Assign a static IP address to your Domain Controller and install Active Directory Domain Services or ADDS. Now follow these instructions:
Open Server Manager and click Roles Summary > Add roles and features.
Click Next.
Select Remote Desktop Services installation if you’re deploying a domain controller in a virtual machine or select role-based or feature-based installation.
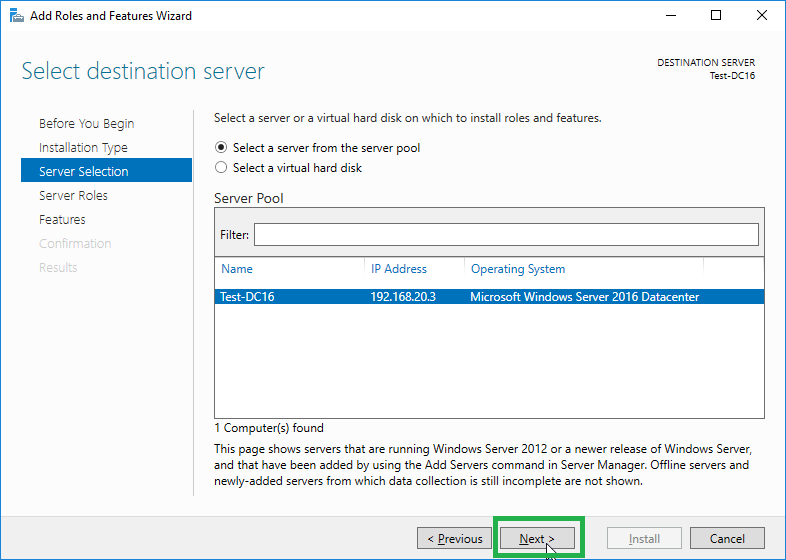
Select a server from the server pool.
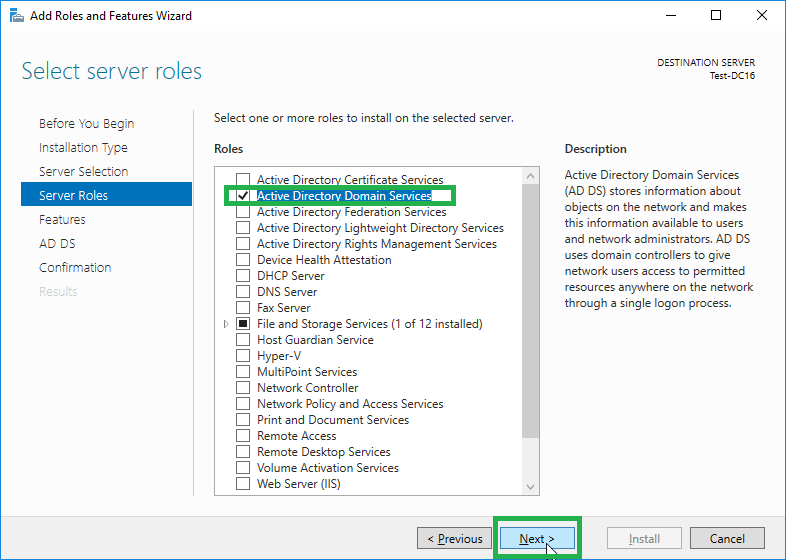
Select Active Directory Domain Services from the list and click Next.
Leave the Features checked by default and press Next.
Click Restart the destination server automatically if required and click Install. Close the window once the installation is complete.
Once the ADDS role has been installed a notification will display next to the Manage menu. Press Promote this server into a domain controller.
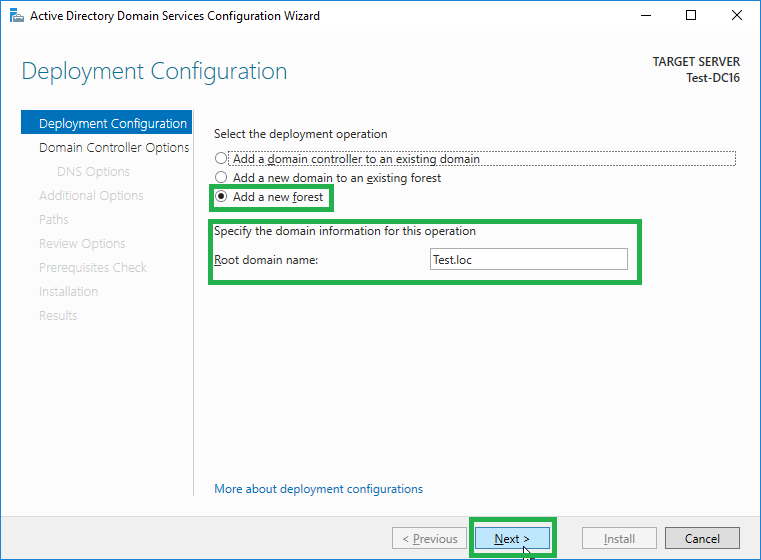
Now click Add a new forest and enter a Root domain name. Press Next.
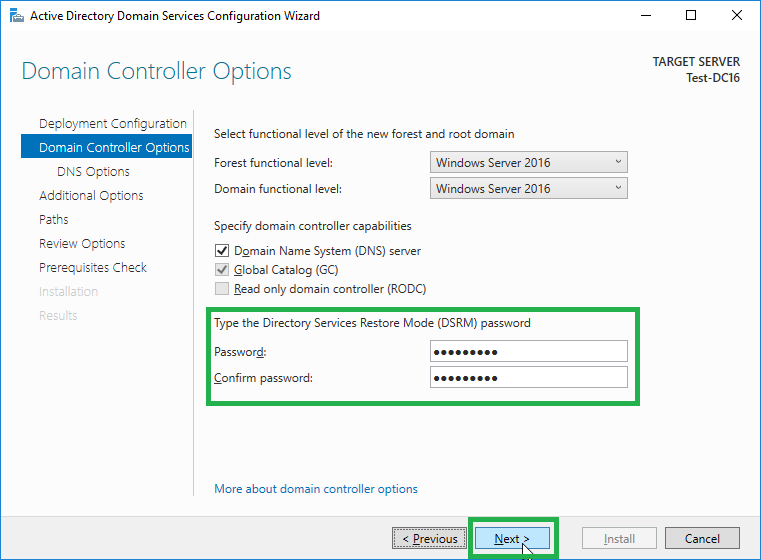
Select the Domain functional level you desire and enter a password into the Type the Directory Services Restore Mode (DSRM password) section. Click Next.
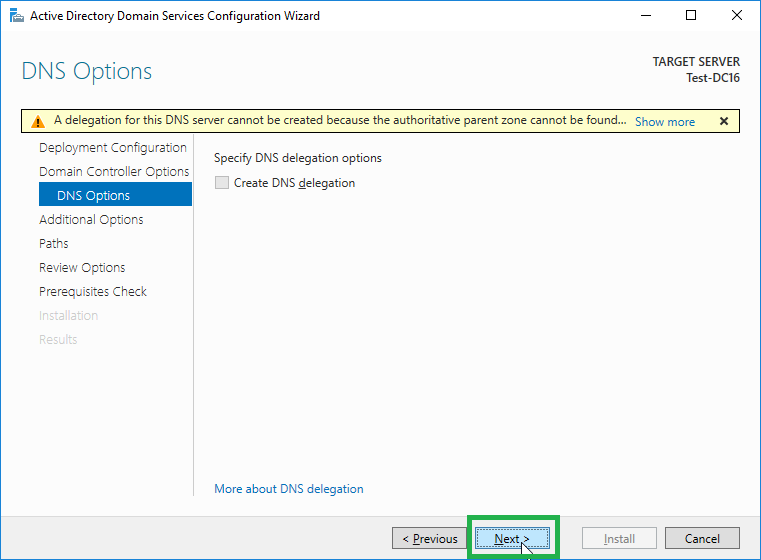
When the DNS Options page displays click Next again.
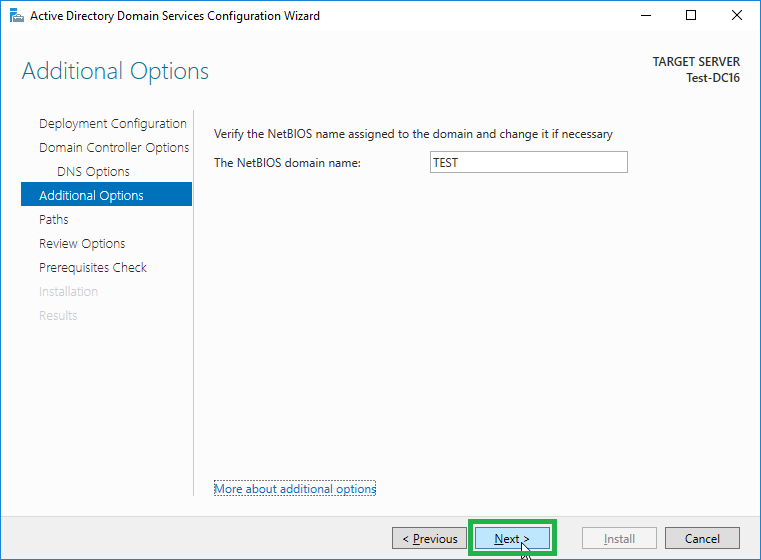
Enter a domain in the NetBios Domain name box (preferably the same as the root domain name). Press Next.
Select a folder to store your database and log files. Click Next.
Press Install to finish. Your system will now reboot.
Add a Domain Controller to an Existing Domain in Windows Server 2016
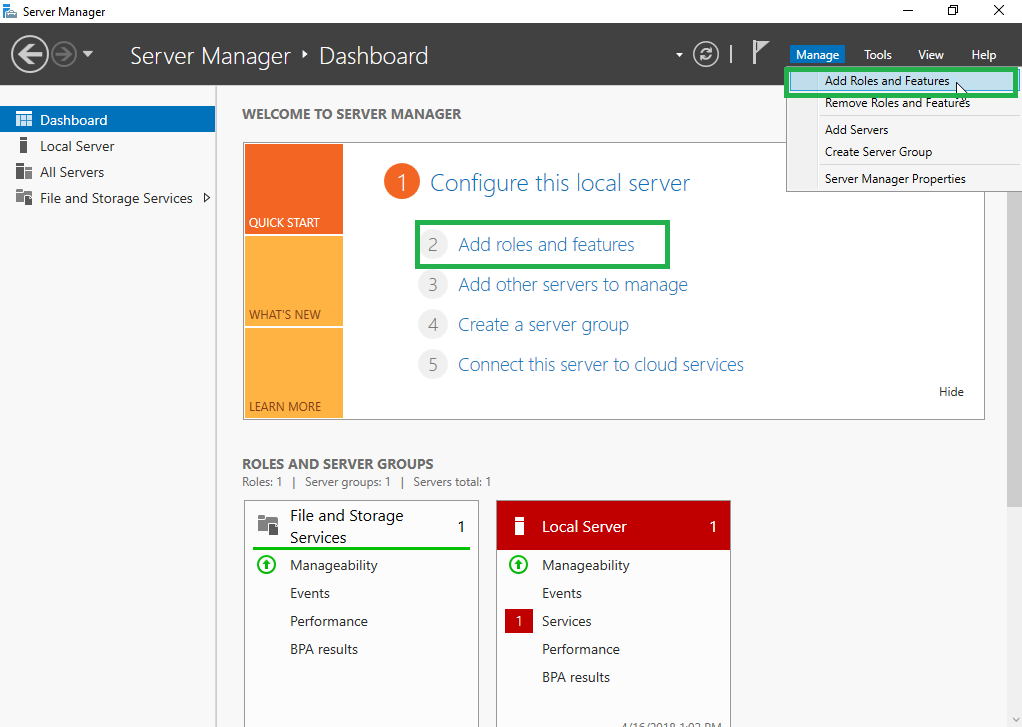
Open Server Manager, click on the Manage option on the menu ribbon and select Add Roles and Features.
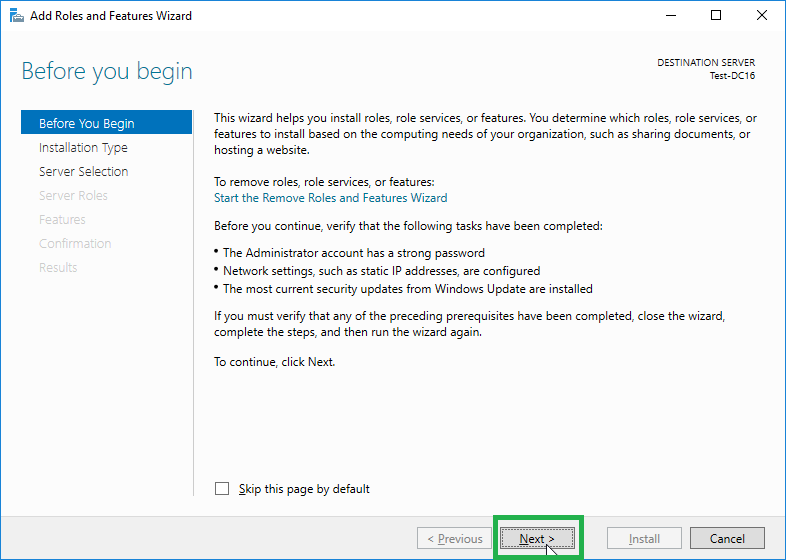
In the opening screen of the wizard, click on Next.
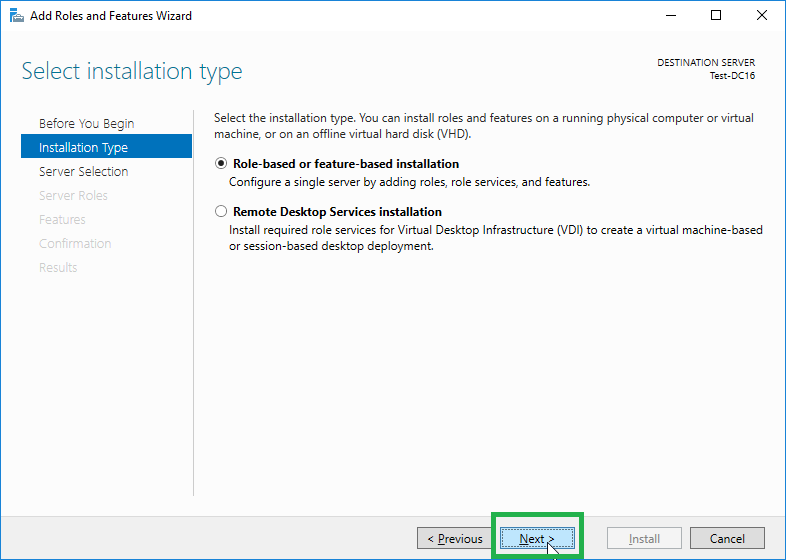
In the Installation Type screen select the Role-based or feature-based installation radio button and click on Next.
In Server Selection leave the only server in the list highlighted and press Next.
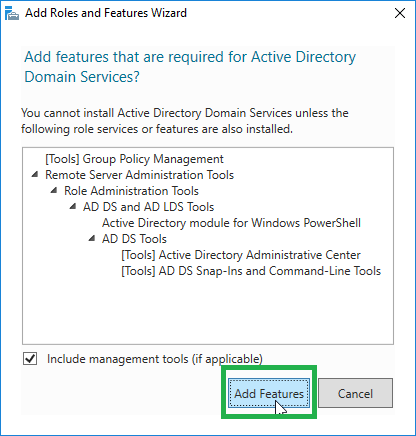
In the Server Roles screen, Check the Active Directory Domain Services box. A dialogue box appears. Click on the Add Features button.
Back in the main feature selection screen, click the Next button.
This cycles through to the Features screen. Just click on the Next button. In the AD DS screen, click on the Next button.
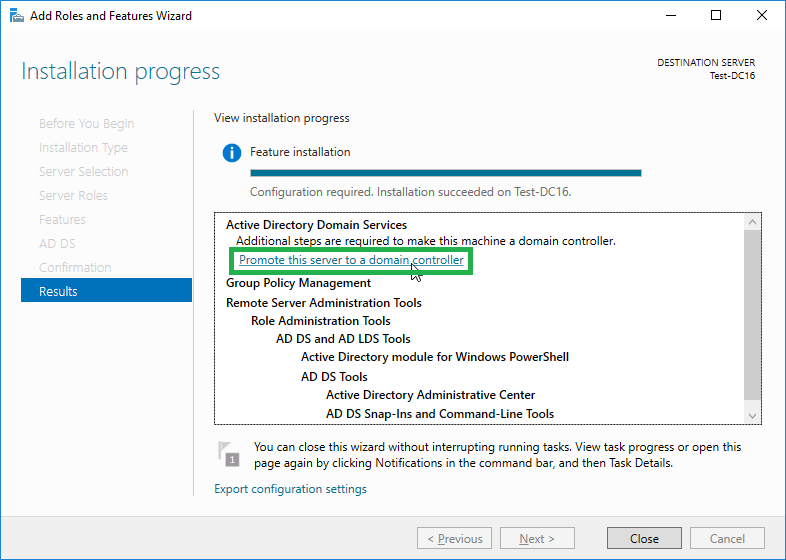
Finally, click the Install button. Once the installation process finishes, you will see a notice telling you that additional steps are required. Click on the link that says Promote this server to a domain controller. This brings up the Deployment Configuration screen.
Leave the Add a domain controller to an existing domain radio button active. At the bottom of the list of options, you will see <no credentials provided>. Click on the Change button next to that.
Enter the username and password of the Administrator account on the AD instance that you first set up. This username should be in the format <domain>\Administrator. Click OK.
On return from the login popup, you will see that the Domain field has been populated with the domain that you entered for the user account. Click on the Next button.
Decide whether to make this a read-only domain controller (RODC). If so, check that box in the Options screen, if not, check both the DNS server and Global Catalogue boxes.
Enter a DSRM password and confirm it. Click on the Next button. You will see a warning but just click on the Next button again.
In Additional Options choose your original domain controller for the Replicate from: field. Click on Next.
Leave all of the paths in their default settings and click on Next. In the Review Options screen, click Next.
The system will perform a prerequisites check. If that completes satisfactorily, the Install button will become active. Click it.
Wait for the installation to complete. The computer will reboot. Log in to the machine.
Creating Active Directory Users
Users and computers are the two most basic objects that you will need to manage when using Active Directory.
The process is relatively simple, and the easiest way to manage users is through the Active Directory Users and Computer or ADUC tool that comes with the Remote Server Administration Tools or RSAT pack.
Install ADUC on Windows 10 Version 1809 and Higher or Windows 11:
Right-click on the Start button and click Settings > Apps, then click Manage optional features > Add feature.
Select RSAT: Active Directory Domain Services and Lightweight Directory Tools.
Select Install and wait for the installation to complete.
Go to Start > Windows Administrative Tools to access the feature.
How to Create New Users with ADUC
Open the Server Manager, go to the Tools menu and select Active Directory Users and Computers.
Expand the domain and click Users.
Right-click on the right pane and press New > User.
When the New Object-User box displays enter a First name, Last name, User logon name, and click Next.
Enter a password and press Next.
Click Finish.
The new user account can be found in the Users section of ADUC.
Active Directory Events to Monitor
Like all forms of infrastructure, Active Directory needs to be monitored to stay protected. Monitoring the directory service is essential for preventing cyber-attacks and delivering the best end-user experience to your users.
| Current Windows Event ID | Legacy Windows Event ID | Description |
| 4618 | N/A | A security event pattern has been recognized. |
| 4649 | N/A | A replay attack was detected (potentially a false positive). |
| 4719 | 612 | A system audit policy was changed. |
| 4765 | N/A | SID History added to an account. |
| 4766 | N/A | The attempt failed to add SID History to account. |
| 4794 | N/A | Attempt to launch Directory Services Restore Mode. |
| 4897 | 801 | Role separation enabled. |
| 4964 | N/A | Special groups have been assigned a new logon. |
| 5124 | N/A | Security updated on OCSP Responder Service. |
| N/A | 550 | Potential DoS attack. |
| 1102 | 517 | Audit log was cleared. |
Forest and trees are two terms you will hear a lot when delving into Active Directory. These terms refer to the logical structure of Active Directory. Briefly, a tree is an entity with a single domain or group of objects that is followed by child domains. A forest is a group of domains put together. When multiple trees are grouped together they become a forest.
Trees in the forest connect to each other through a trust relationship, which enables different domains to share information. All domains will trust each other automatically so you can access them with the same account info you used on the root domain.
Logically, the forest sits at the highest level of the hierarchy and the tree is located at the bottom.
Trust Relationships (and Trust Types)
Trusts are used to facilitate communication between domains. Trusts enable authentication and access to resources between two entities. Trusts can be one-way or two-way in nature. Within a trust, the two domains are divided into a trusting domain and a trusted domain.
the trusting domain accesses the authentication details of the trusted domain so that the user can access resources from the other domain. In a two-way trust, both domains will accept the other’s authentication details. All domains within a forest trust each other automatically, but you can also set up trusts between domains in different forests to transfer information.
You can create trusts through the New Trusts Wizard. The New Trust Wizard is a configuration wizard that allows you to create new trust relationships.
| Trust Type | Transit Type | Direction | Default? | Description |
| Parent and child | Transitive | Two-way | Yes | A parent and child trust is established when a child domain is added to a domain tree. |
| Tree-root | Transitive | Two-way | Yes | A tree-root trust is established the moment a domain tree is created within a forest. |
| External | Non-transitive | One-way or two-way | No | Provides access to resources in a Windows NT 4.0 domain or a domain located in a different forest that isn’t supported by a forest trust. |
| Realm | Transitive or non-transitive | One-way or two-way | No | Forms a trust relationship between a non-Windows Kerberos realm and a Windows Server 2003 domain. |
| Forest | Transitive | One-way or two-way | No | Shares resources between forests. |
| Shortcut | Transitive | One-way or two-way | No | Reduces user logon times between two domains within a Windows Server 2003 forest. |
How to Find the Source of Account Lockouts in Active Directory
Open a PowerShell window by pressing the Windows key and R together. In the Run popup, type powershell and hit ENTER.
At the command line type (get-addomain).pdcemulator
Note down the address of the PCD Emulator domain controller, which will be shown on the next line.
Type exit to close the PowerShell window.
The standard event log viewer that is built into the Windows operating system will help you find the account lockouts.
Go to the DC named as the PDC Emulator.
Open the Event Viewer by expanding Windows Administrative Tools in the Start menu and clicking on the Event Viewer entry in that submenu.
In the Event Viewer, expand the Windows Logs node in the left-hand menu tree. Click on Security. The Security events list will appear in the central panel of the Event Viewer.
In the right panel of the Event Viewer, click on Filter Current Log, which will open a popup window.
In the Event IDs field replace <All Event IDs> with 4740.
Select a time horizon in the Logged drop-down list at the top of the form.
Optionally, enter a username or a hostname if you are specifically looking for a lockout on a specific user or resource.
Press OK.
Double click on the log entry that relates to the user or resource that interests you and that has a timestamp that matches the moment you think the lockout occurred. This will open the Event Report.
Active Directory Management with ManageEngine AD360 (FREE TRIAL)
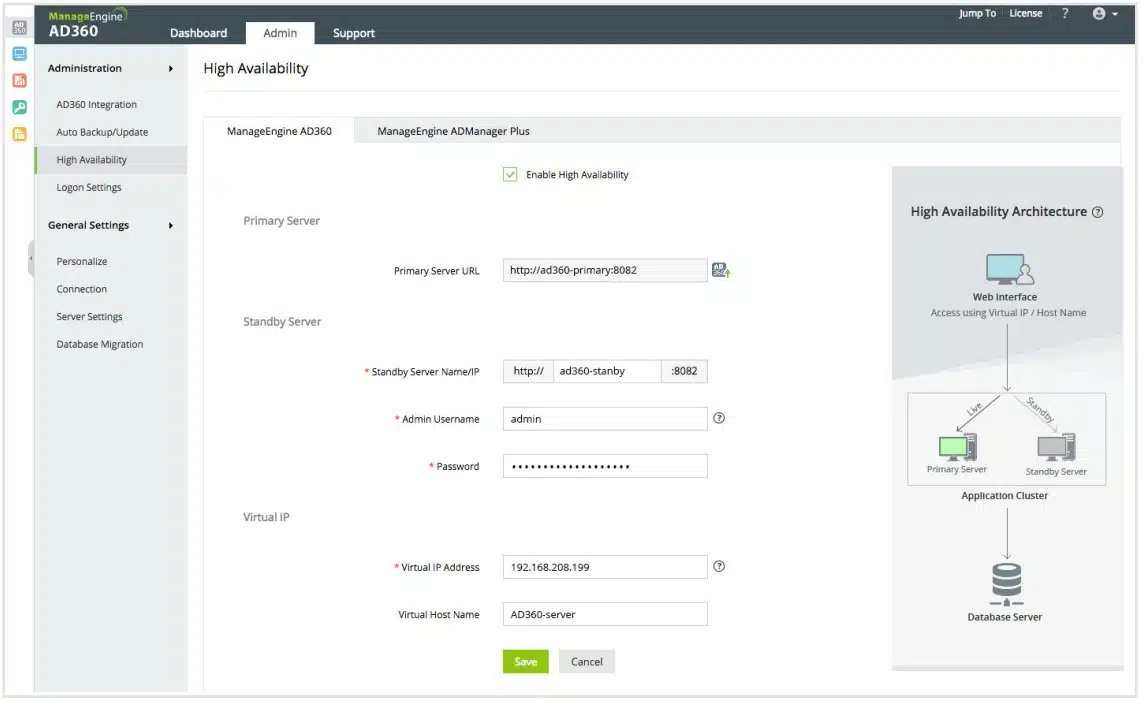
ManageEngine AD360 is a compendium of ManageEngine Active Directory management systems plus a backup and recovery service. This package represents a good example of the tools that are available to automate the management tasks surrounding Active Directory usage. It is able to interface to AD implementations for SharePoint, Microsoft 365, Azure, and AWS, as well as the Active Directory system that you have in your Windows Server operating system.
Pros:
Package of AD tools
Enforces multi-factor authentication
Audits AD objects to improve group management
Detects inactive accounts
User behavior analytics
What is the difference between an Active directory and a Domain controller?
Active Directory is an authentication system. A domain is a collection of objects, which are users, computers, and devices that all have access rights managed in the same Active Directory database. The domain controller is the authentication management system that implements Active Directory functions on the domain’s database objects.
How to enable the Security Auditing of Active Directory?
In order to start security auditing within Active Directory:
Log in to Windows Server as an administrator.
Go to Start, click on Administrative tools, and select Group policy management console.
Get to the domain/OU to be audited.
Right-click on the Group Policy Object, and choose Edit. This will open the Group Policy Management Editor.
In the left-hand tree menu, expand Computer Configuration, then Policies, expand Windows Settings, then Security Settings, and finally Local Policies. Click on Audit Policies.
In the main panel of the Editor, click on Audit object access and select both the Success and Failure options.
Click on Audit directory service access and select both the Success and Failure options.
What is the difference between Active Directory and LDAP?
The Lightweight Directory Access Protocol (LDAP) is an open standard that outlines how access rights can be managed. Active Directory is an access rights management system, written by Microsoft. Active Directory is an evolution of the concepts defined in LDAP.
What are Active Directory and Single sign-on and what are the differences between them?
Single sign-on (SSO) gives each user access to several systems with just one authentication procedure. Active Directory (AD) is an access rights management system that can implement an SSO environment.
Can I install Active Directory on client operating systems?
No. Active Directory is a server function and it is integrated into the Windows Server operating system. Logically, any client running Active Directory would become a server.
What is the difference between an Active directory and a Domain controller?
Active Directory is an authentication system. A domain is a collection of objects, which are users, computers, and devices that all have access rights managed in the same Active Directory database. The domain controller is the authentication management system that implements Active Directory functions on the domain’s database objects.
What should you look for in Active Directory tools?
We reviewed the market for Active Directory monitoring software and analyzed the options based on the following criteria:
An interface that offers an easier way to organize Active Directory
Reporting functions for auditing
The ability to monitor many AD instances
Tracking for replication, synchronization, backup, and migration
Fast account status identification
A free trial that provides a no-cost assessment period
Value for money from a tool that pays for itself in efficiency improvements
What is Active Directory?
Active Directory is a Microsoft Technology for identity management in computer networks. It’s a database that contains users and computer accounts as well as their passwords.
When you install the AD DS server role, you will finish the installation by promoting the server to a domain controller. This will install several tools including:
Active Directory Administrative Center
Active Directory Domains and Trusts
Active Directory Module for Windows PowerShell
Active Directory Sites and Services
Active Directory Users and Computers
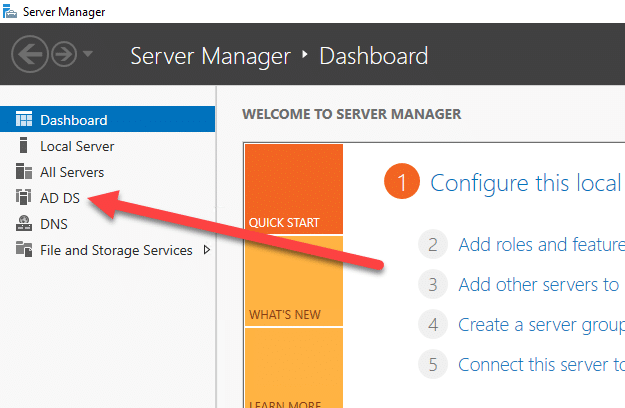
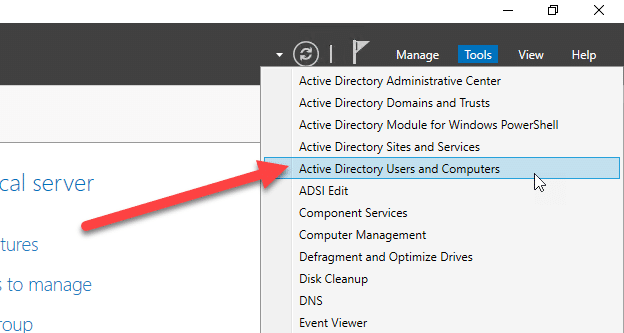
Organizational Units and Containers
When you first launch Active Directory, you will see a collection of what appears to be folders. These “folders” are comprised of a builtinDomain, Containers and Organizational Units.
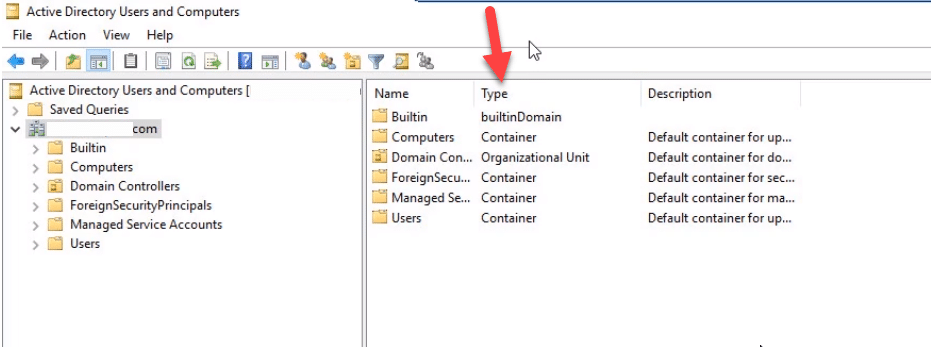
BuiltinDomain
The BuiltinDomain object contains the security groups that are required for your domain to operate. You cannot delete any of these Security Groups as they are all required by the domain.
Containers
Containers are structural objects that are included by default within Active Directory. The most important difference between OUs and containers is that you cannot apply Group Policy Objects (GPOs) to containers. . You also cannot create a container in Active Directory although you can use ADSI Edit to create containers.
By default, the containers you will immediately see in Active Directory are Computers, ForeignSecurityPrincipals, Managed Service Accounts and Users.
Organizational Units (OUs)
Organizational Units (commonly referred to as OUs) are used to organize and separate objects within active directory. The objects could be anything that Active Directory could store like user accounts, computers, printers, file shares etc.
If your company had a marketing team, you might create a new OU called “Marketing” and store all your marketing users accounts inside this OU.
Create an Organizational Unit
To create a new Organizational Unit, right-click on the desired location (in my case, ad.serveracademy.com) and select Organizational Unit. I am going to name this “Test OU”.
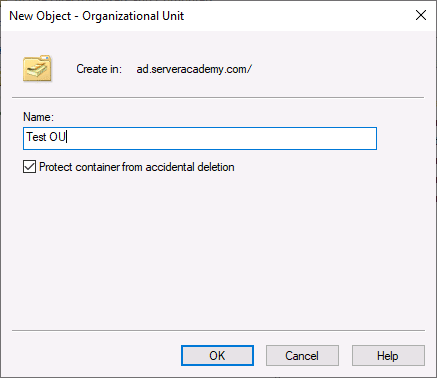
Delete an Organizational Unit
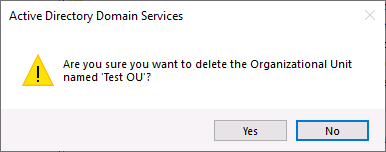
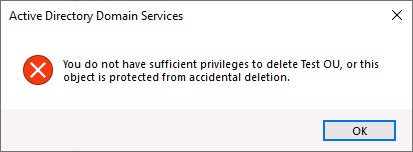
If you remember when we created the OU we checked the Protect this OU from accidental deletion checkbox. In order to remove the protection, we need to enable the advanced view within Active Directory and turn off the protection with the OU’s properties. Click OK to close the warning message. Select View \> Advanced Features.
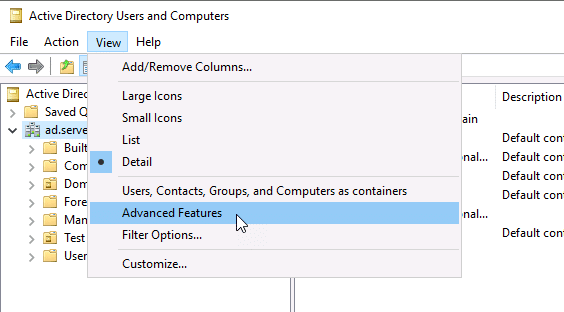
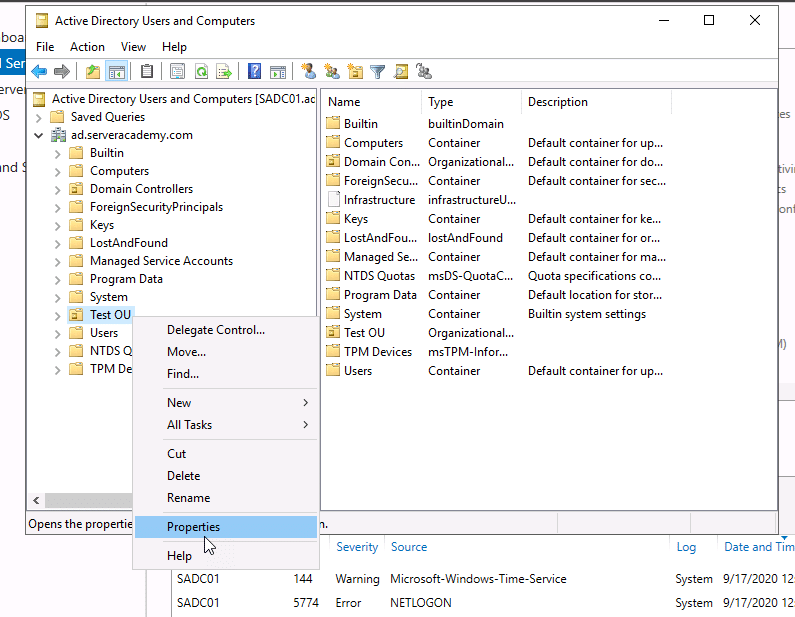
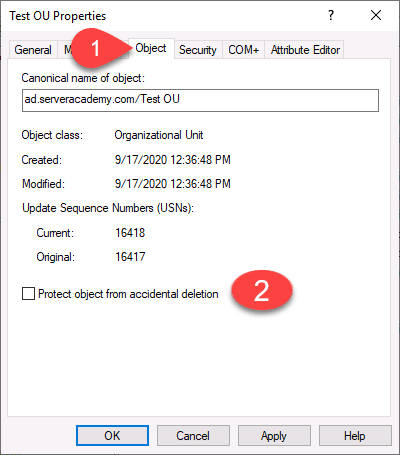
Now when we right-click the OU and select Delete we will no longer get the error and the OU has been deleted.
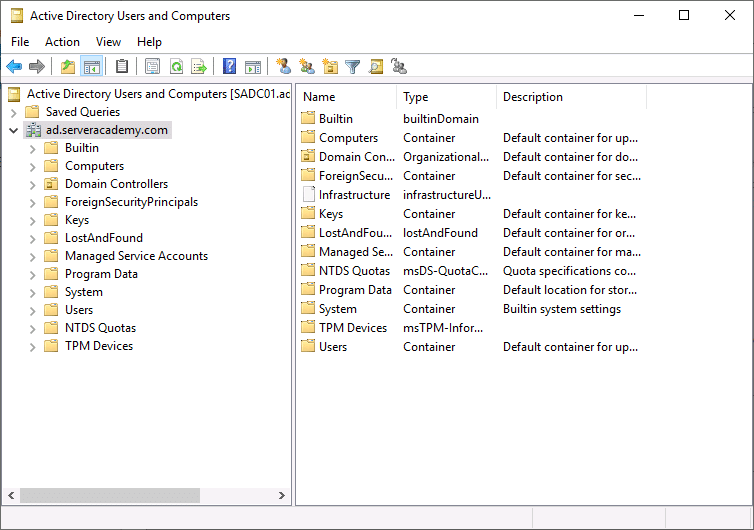
Create a new AD user
To create a new Active Directory user, right click your desired location in AD UC (Active Directory Users and Computers), and select New > Users. I’m going to do this inside of a Server Academy > Domain Users OUs I created:
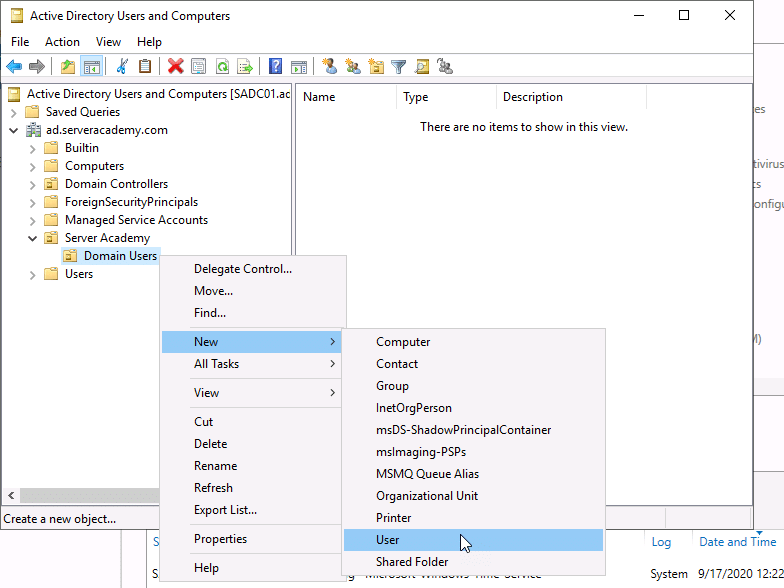
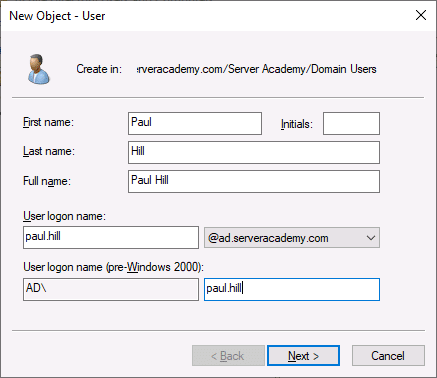
Once you’re done click Next and you will be able to specify the user password as well as deciding the following:
- User must change password at next logon
Use this when you’re creating a user account and you’re emailing them the password or using the same password for multiple accounts.
- User cannot change password
You will rarely use this. Possibly useful for service accounts, but again not a common choice.
- Password never expires
This is a bad security practice – but it can be useful for service accounts if you don’t care about the security issues with using the same password for a very long time (like in a lab environment).
- Account is disabled
Use this when you are creating the user account for a new hire and they haven’t started the job yet.
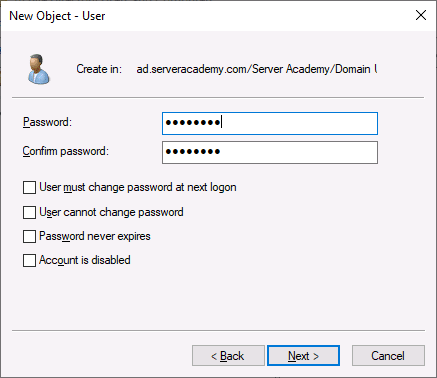
Username and Password Screen
Now click next:
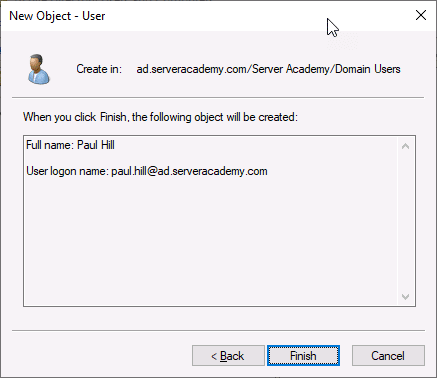
Finish new AD user account creation
Now inside of Active Directory I can see the new user account:
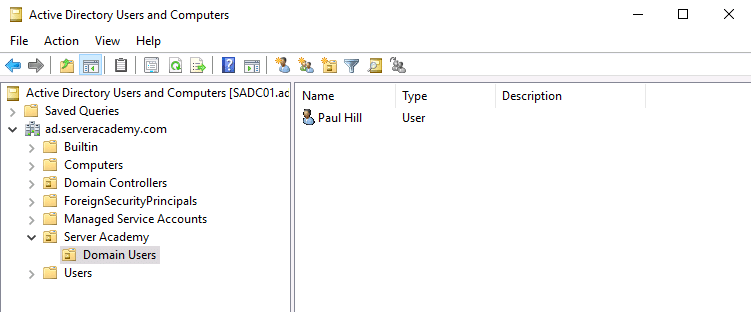
New AD User Account
Resetting User Passwords in Active Directory
To reset a user password, simply right click on the user and select Reset Password as shown in the image below:
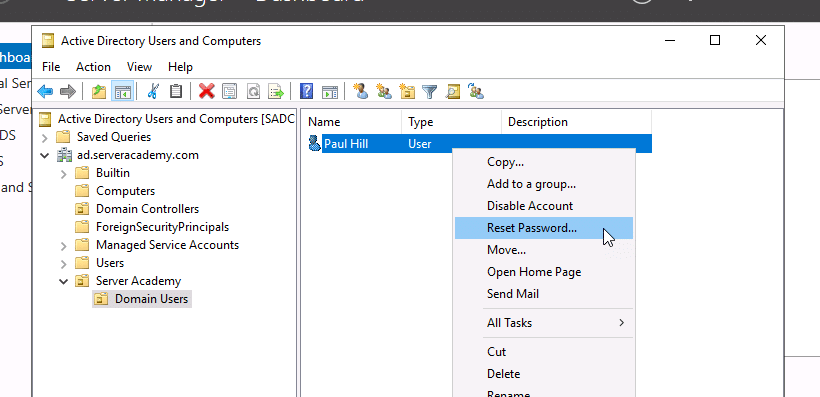
Resetting AD User Password
If you cannot locate the user account, click the Find objects in Active Directory Services button, type in the name of the user, and change the In dropdown to Entire Directory:
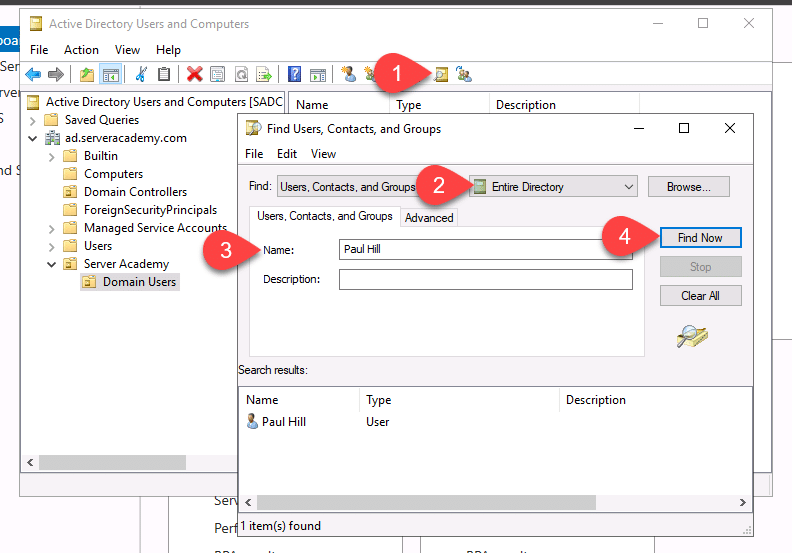
Search for Active Directory User Accounts
Once you find your user account you can right-click the user and select Reset Password
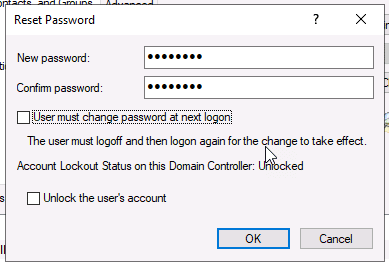
Reset Password Window
You can force the user to change their password at the next login. If you enable this option then the user will see this screen the next time they log in:
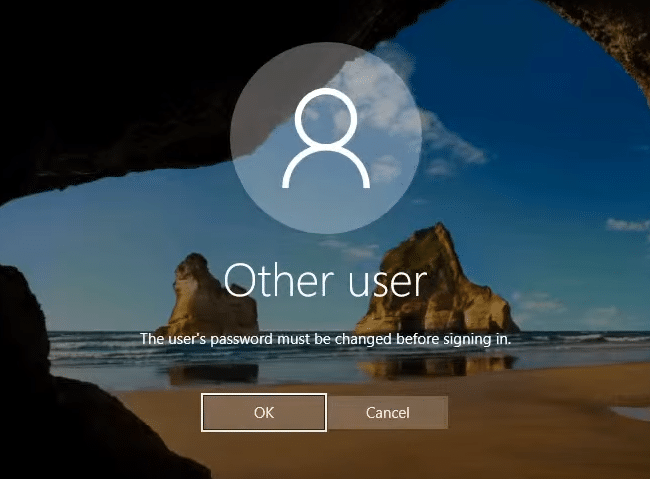
The user’s password must be changed before signing in.
If the user account is locked, you can check the second check box to unlock the account at the same time you reset the user password.
Managing Group Memberships
You can manage a users group membership by double clicking on the user and selecting the Member Of tab:
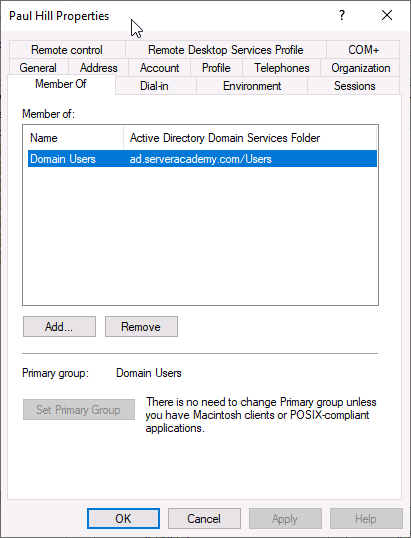
Manage User Groups
You can add or remove groups by clicking either the Add or Remove buttons respectively. You can learn more about the Active Directory groups that are available to you by default by clicking here.
We can open any of the listed Active Directory Groups by double clicking on them. In this example I am going to double-click Domain Users:
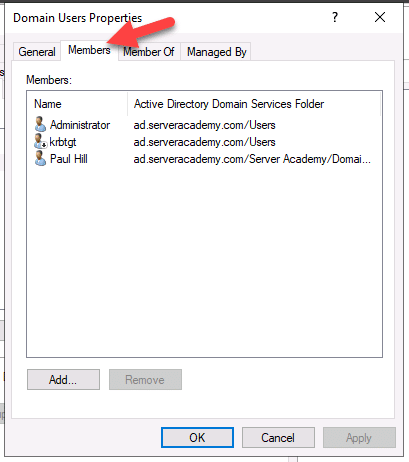
Members of Domain Users Group
Here you can look at all of the users who are members of the Domain Users Group. You will notice that you can also add or remove users from this view as well.
Disabling and Deleting User Accounts in Active Directory
You can disable a user account by right-clicking on the user and selecting Disable Account:
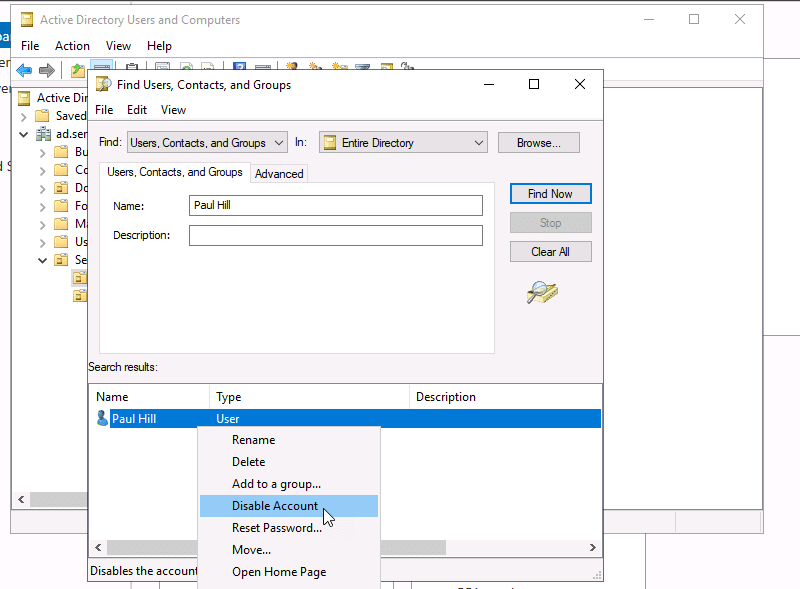
Disabling Active Directory User Accounts
The next time the user attempts to log in they will see the following message:
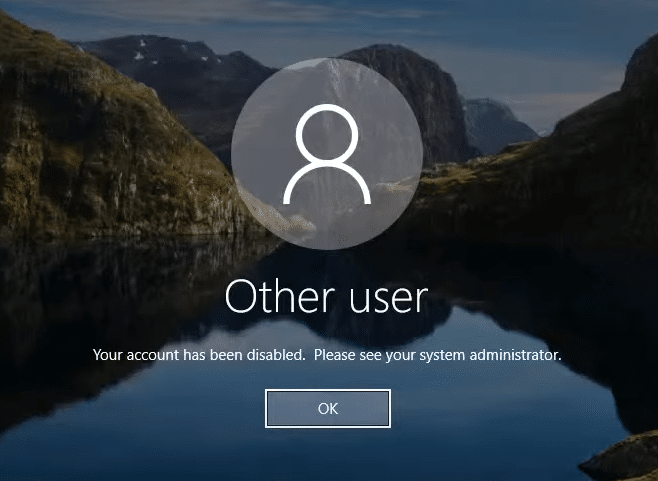
Your account has been disabled in Active Directory
Usually you will disable a user account for a period of time (like 90 days) before deleting the user account.
To delete a user account you can simply right-click the user and select Delete:
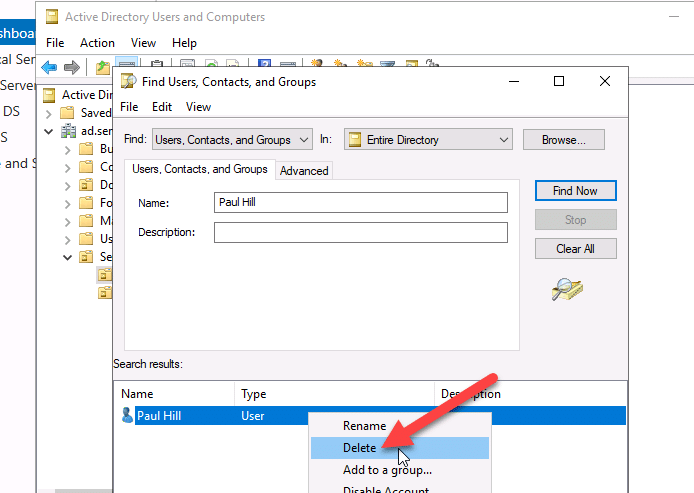
Delete an Active Directory User Account
Once the account has been deleted obviously it will be gone permanently and can no longer be used.
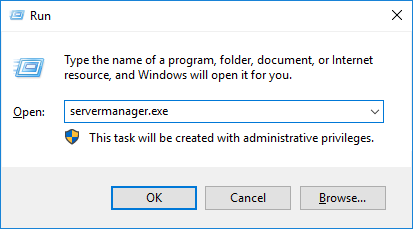
1)Open Server Manager
2) Choose either “Add Roles and Features” Option
3) Click Next
4) Click Next
5) Select the server
If installing to the local machine, simply click next
6) Check “Active Directory Domain Services” and click Next
7) Click Add Features
8) Click Next
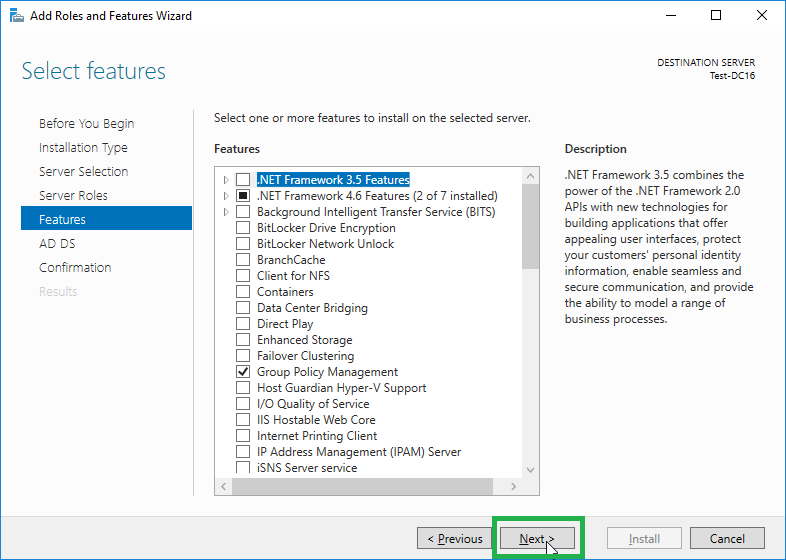
9) Click Next
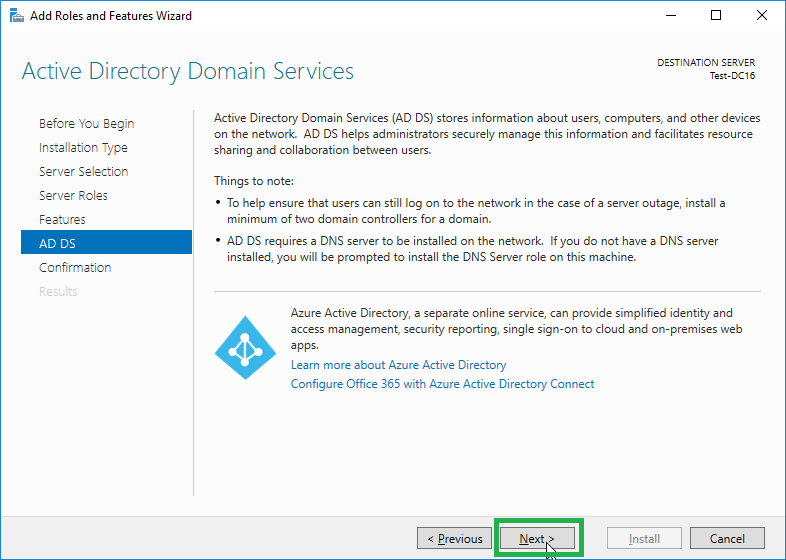
10) Click Install
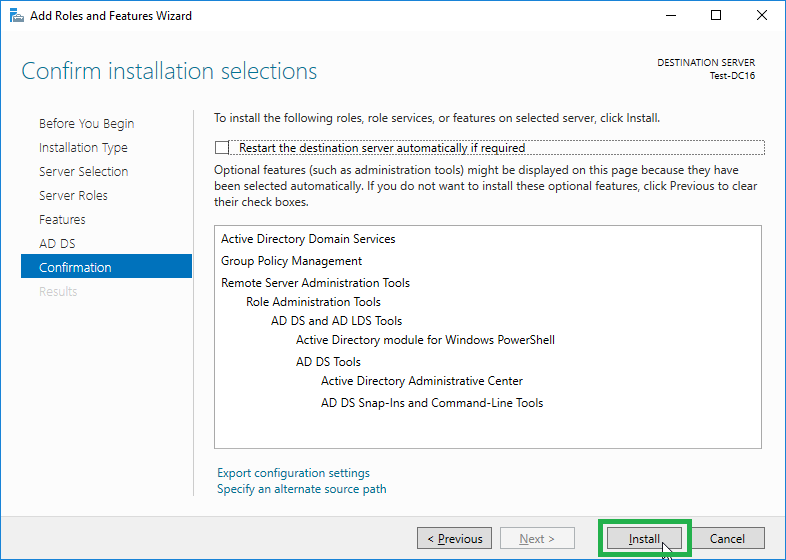
11) Wait for the install to finish and click “Promote this server to a domain controller”
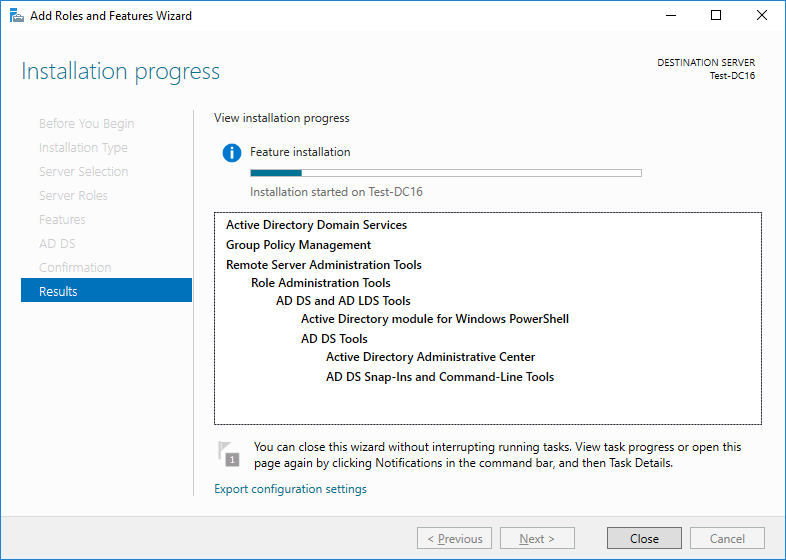
12) Choose “Add a new forest”, enter a Domain Name, and Click Next
This is assuming that the server is not going to be part of a pre-existing domain and the new domain is not going to be added to a pre-existing forest.
13) Enter a password for DSRM and click next
Again, this is assuming that the server is a new, stand-alone, Domain Controller. If it will be joining a pre-existing forest and/or domain, the functional levels may need to be changed to match the function levels currently in place.
14) Click Next
This is assuming you do not have existing DNS servers for which delegation may be required.
15) Click Next
16) Click Next
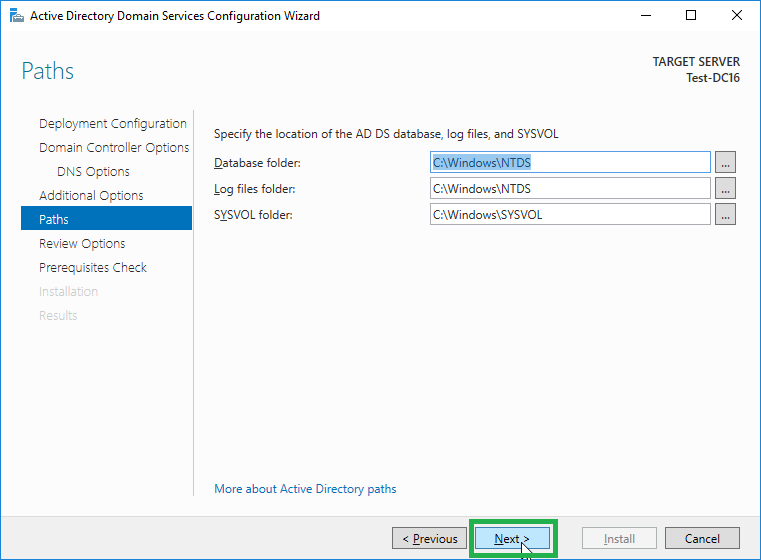
17) Click Next
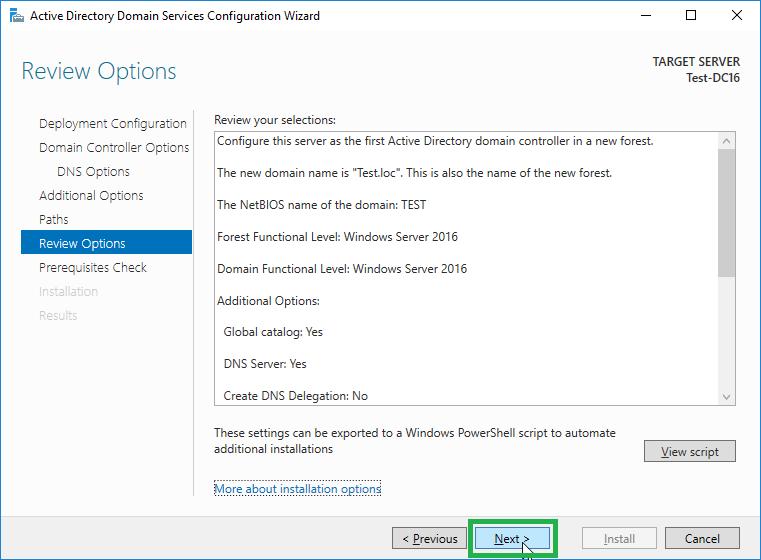
18) Click Install
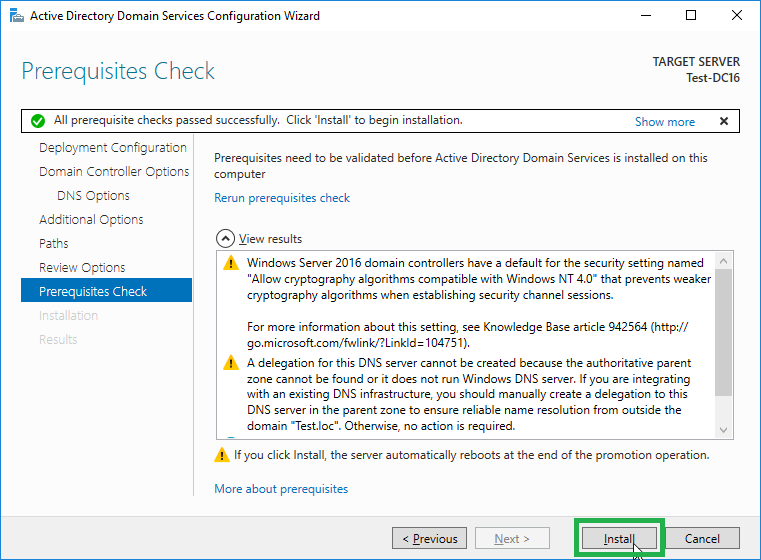
19) Wait for Install to Finish