Docker-Volume
Docker allows us to create something called volumes.
Volumes are like separate storage areas that can be accessed by containers. They allow to store data, like a database, outside the container, so it doesn't get deleted when the container is deleted. You can also mount from the same volume and create more containers having same data.
Volumes can be shared between containers.
Creating Volumes
$ docker volume create volume_name
3.2. Listing Volumes
If a name is not specified, Docker generates a random name:
$ docker volume create
d7fb659f9b2f6c6fd7b2c796a47441fa77c8580a080e50fb0b1582c8f602ae2f
Listing Volumes
$ docker volume ls
DRIVER     VOLUME NAME
local     data_volume
local   d7fb659f9b2f6c6fd7b2c796a47441fa77c8580a080e50fb0b1582c8f602ae2f
Using Filter
$ docker volume ls -f name=data
DRIVER     VOLUME NAME
local     data_volume
Inspecting Volumes
$ docker volume inspect ca808e6fd82590dd0858f8f2486d3fa5bdf7523ac61d525319742e892ef56f59
Removing Volumes
$ docker volume rm volume_name
volume_name
Pruning Volumes
$ docker volume prune
WARNING! This will remove all local volumes not used by at least one container.
Are you sure you want to continue? [y/N] y
Deleted Volumes:
volume_name
Starting a Container with a Volume
Using -v
$ docker run -v $(pwd):/var/opt/project bash:latest \
  bash -c "ls /var/opt/project"
This syntax also supports mounting a volume:
$ docker run -v volume_name:/var/opt/project bash:latest \
  bash -c "ls /var/opt/project"
$ docker run -v volume_name:/var/opt/project bash:latest \
  bash -c "echo Baeldung > /var/opt/project/Baeldung.txt"Copy
Then our subsequent use of a container with this volume mounted would be able to access the file:
$ docker run -v data-volume:/var/opt/project bash -c "ls /var/opt/project"
file.txt
The -v option contains three components, separated by colons:
Source directory or volume name
Mount point within the container
(Optional) ro if the mount is to be read-only
Using the –mount Option
$ docker run --mount \
  'type=volume,src=data-volume,\
  dst=/var/opt/project,volume-driver=local,\
  readonly' \
  bash -c "ls /var/opt/project"
The input to –mount is a string of key-value pairs, separated by commas. Here we've set:
type – as volume to indicate a volume mount
src – to the name of the volume, though this could have been a source directory if we'd been making a bind mount
dst – as the destination mount point in the container
volume-driver – the local driver in this case
readonly – to make this mount read-only; we could have chosen rw for read/write
Using –volumes-from to Share Volumes
$ docker ps -a
CONTAINER ID   IMAGE             COMMAND                  CREATED              STATUS                          PORTS      NAMES
4920602f8048   bash              "docker-entrypoint.s…"   7 minutes ago        Exited (0) 7 minutes ago                   exciting_payne
We could run our next container, by copying the volumes used by this one:
$ docker run --volumes-from 4920 \
  bash:latest \
  bash -c "ls /var/opt/project"
file.txt
In practice –volumes-from is usually used to link volumes between running containers. Jenkins uses it to share data between agents running as Docker containers.
Docker Network
Docker allows you to create virtual spaces called networks, where you can connect multiple containers (small packages that hold all the necessary files for a specific application to run) together. This way, the containers can communicate with each other and with the host machine (the computer on which the Docker is installed). When we run a container, it has its own storage space that is only accessible by that specific container. If we want to share that storage space with other containers, we can't do that.
Listing All Docker Networks
docker network ls
sudo docker network ls
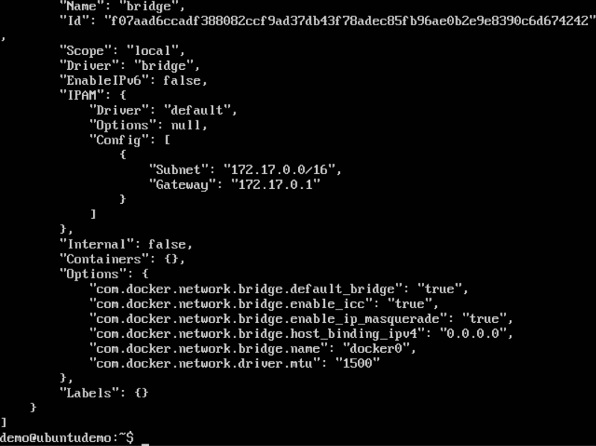
Output

Inspecting a Docker network
docker network inspect networkname
Options
- networkname − This is the name of the network you need to inspect.
Return Value
The command will output all the details about the network.
Example
sudo docker network inspect bridge
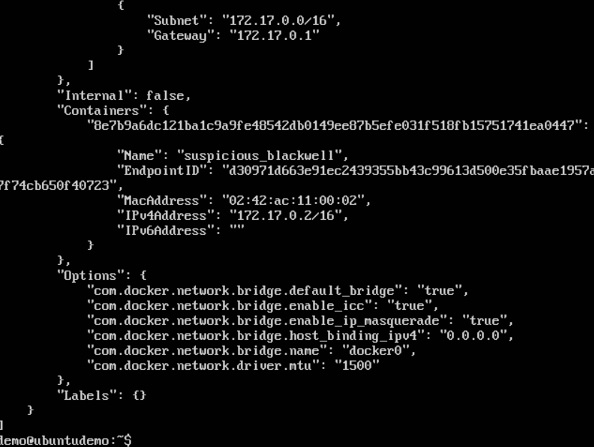
Output

sudo docker run –it ubuntu:latest /bin/bash

Now if we inspect our network name via the following command, you will now see that the container is attached to the bridge.
sudo docker network inspect bridge

Creating Your Own New Network
docker network create –-driver drivername name
Options
drivername − This is the name used for the network driver.
name − This is the name given to the network.
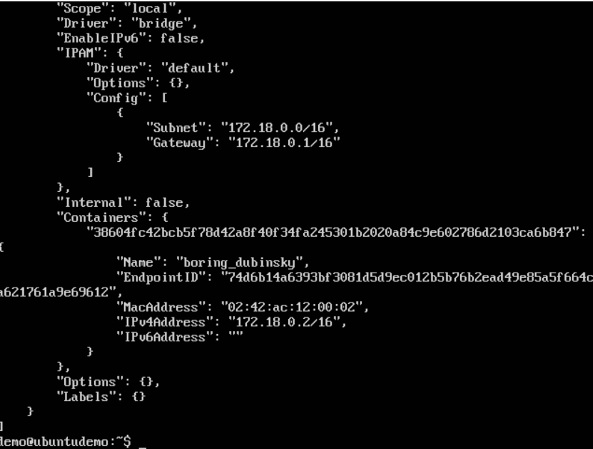
sudo docker network create –-driver bridge new_nw

sudo docker run –it –network=new_nw ubuntu:latest /bin/bash

sudo docker network inspect new_nw

#
Docker-Volume
Docker allows us to create something called volumes.
Volumes are like separate storage areas that can be accessed by containers. They allow to store data, like a database, outside the container, so it doesn't get deleted when the container is deleted. You can also mount from the same volume and create more containers having same data.
Volumes can be shared between containers.
Creating Volumes
Bash
$ docker volume create volume_name
3.2. Listing Volumes
If a name is not specified, Docker generates a random name:
Bash
$ docker volume create
d7fb659f9b2f6c6fd7b2c796a47441fa77c8580a080e50fb0b1582c8f602ae2f
Listing Volumes
Bash
$ docker volume ls
DRIVER     VOLUME NAME
local     data_volume
local   d7fb659f9b2f6c6fd7b2c796a47441fa77c8580a080e50fb0b1582c8f602ae2f
Using Filter
Bash
$ docker volume ls -f name=data
DRIVER     VOLUME NAME
local     data_volume
Inspecting Volumes
Bash
$ docker volume inspect ca808e6fd82590dd0858f8f2486d3fa5bdf7523ac61d525319742e892ef56f59
Removing Volumes
Bash
$ docker volume rm volume_name
volume_name
Pruning Volumes
Bash
$ docker volume prune
WARNING! This will remove all local volumes not used by at least one container.
Are you sure you want to continue? [y/N] y
Deleted Volumes:
volume_name
Starting a Container with a Volume
Using -v
Bash
$ docker run -v $(pwd):/var/opt/project bash:latest \
  bash -c "ls /var/opt/project"
This syntax also supports mounting a volume:
Bash
$ docker run -v volume_name:/var/opt/project bash:latest \
  bash -c "ls /var/opt/project"
Bash
$ docker run -v volume_name:/var/opt/project bash:latest \
  bash -c "echo Baeldung > /var/opt/project/Baeldung.txt"Copy
Then our subsequent use of a container with this volume mounted would be able to access the file:
Bash
$ docker run -v data-volume:/var/opt/project bash -c "ls /var/opt/project"
file.txt
The -v option contains three components, separated by colons:
Source directory or volume name
Mount point within the container
(Optional) ro if the mount is to be read-only
Using the –mount Option
Bash
$ docker run --mount \
  'type=volume,src=data-volume,\
  dst=/var/opt/project,volume-driver=local,\
  readonly' \
  bash -c "ls /var/opt/project"
The input to –mount is a string of key-value pairs, separated by commas. Here we've set:
type – as volume to indicate a volume mount
src – to the name of the volume, though this could have been a source directory if we'd been making a bind mount
dst – as the destination mount point in the container
volume-driver – the local driver in this case
readonly – to make this mount read-only; we could have chosen rw for read/write
Using –volumes-from to Share Volumes
Bash
$ docker ps -a
CONTAINER ID   IMAGE             COMMAND                  CREATED              STATUS                          PORTS      NAMES
4920602f8048   bash              "docker-entrypoint.s…"   7 minutes ago        Exited (0) 7 minutes ago                   exciting_payne
We could run our next container, by copying the volumes used by this one:
Bash
$ docker run --volumes-from 4920 \
  bash:latest \
  bash -c "ls /var/opt/project"
file.txt
In practice –volumes-from is usually used to link volumes between running containers. Jenkins uses it to share data between agents running as Docker containers.
Docker Network
Docker allows you to create virtual spaces called networks, where you can connect multiple containers (small packages that hold all the necessary files for a specific application to run) together. This way, the containers can communicate with each other and with the host machine (the computer on which the Docker is installed). When we run a container, it has its own storage space that is only accessible by that specific container. If we want to share that storage space with other containers, we can't do that.
Listing All Docker Networks
Plain Text
docker network ls
Plain Text
sudo docker network ls
Output

Inspecting a Docker network
Plain Text
docker network inspect networkname
Options
- networkname − This is the name of the network you need to inspect.
Return Value
The command will output all the details about the network.
Example
Plain Text
sudo docker network inspect bridge
Output

Plain Text
sudo docker run –it ubuntu:latest /bin/bash

Now if we inspect our network name via the following command, you will now see that the container is attached to the bridge.
Plain Text
sudo docker network inspect bridge

Creating Your Own New Network
Plain Text
docker network create –-driver drivername name
Options
drivername − This is the name used for the network driver.
name − This is the name given to the network.
Plain Text
sudo docker network create –-driver bridge new_nw

Plain Text
sudo docker run –it –network=new_nw ubuntu:latest /bin/bash

Plain Text
sudo docker network inspect new_nw

Sample YAML File:
version : "3.3"
services:
  web:
    image: varsha0108/local_django:latest
    deploy:
        replicas: 2
    ports:
      - "8001-8005:8001"
    volumes:
      - my_django_volume:/app
  db:
    image: mysql
    ports:
      - "3306:3306"
    environment:
      - "MYSQL_ROOT_PASSWORD=test@123"
volumes:
  my_django_volume:
    external: true
Configure MySQL
version: '3.4'
services:
  super-app-db:
    image: mysql:8.0.28
    environment:
      MYSQL_DATABASE: 'super-app'
      MYSQL_ROOT_PASSWORD: '$SuperApp1'
    ports:
      - '3306:3306'
    expose:
      - '3306'
Create multi-container apps with MySQL and Docker Compose
docker-compose version
Start MySQL
docker network create todo-appStart a MySQL container and attach it the network.
BashCopy
 docker run -d
     --network todo-app --network-alias mysql
     -v todo-mysql-data:/var/lib/mysql
     -e MYSQL_ROOT_PASSWORD=<your-password>
     -e MYSQL_DATABASE=todos
     mysql:5.7
Get your container ID by using the
docker pscommand.To confirm you have the database up and running, connect to the database.
docker exec -it <mysql-container-id> mysql -pEnter the password you used, above, when prompted.
SHOW DATABASES;You should see the following output.
OutputCopy
 +--------------------+
 | Database           |
 +--------------------+
 | information_schema |
 | mysql              |
 | performance_schema |
 | sys                |
 | todos              |
 +--------------------+
 5 rows in set (0.00 sec)
Run your app with MySQL
The todo app supports the setting of environment variables to specify MySQL connection settings.
MYSQL_HOSTThe hostname for the MySQL server.MYSQL_USERThe username to use for the connection.MYSQL_PASSWORDThe password to use for the connection.MYSQL_DBThe database to use once connected.
Use the following docker run command. It specifies the environment variables above.
 docker run -dp 3000:3000
   -w /app -v ${PWD}:/app
   --network todo-app
   -e MYSQL_HOST=mysql
   -e MYSQL_USER=root
   -e MYSQL_PASSWORD=<your-password>
   -e MYSQL_DB=todos
   node:12-alpine
   sh -c "yarn install && yarn run dev"
use the
docker logscommand.Enter
http://localhost:3000into your browser. Add some items to your todo list.Connect to the MySQL database, as you did in the previous section. Run this command to verify that the items are being written to the database.
docker exec -ti <mysql-container-id> mysql -p todosselect * from todo_items;
Create a Docker Compose file
Docker Compose helps define and share multi-container applications. With Docker Compose, you can create a file to define the services. With a single command, you can spin up everything or tear it all down.
At the root of the app project, create a file named
docker-compose.yml.In the compose file, start by defining the schema version.
YAMLCopy
version: "3.7"Define the services, or containers, you want to run as part of your application.
YAMLCopy
 version: "3.7"

 services:
version: "3.7" services: app: image: node:12-alpineversion: "3.7" services: app: image: node:12-alpine command: sh -c "yarn install && yarn run dev"version: "3.7" services: app: image: node:12-alpine command: sh -c "yarn install && yarn run dev" ports: - 3000:3000Specify the working directory and the volume mapping
YAMLCopy
version: "3.7" services: app: image: node:12-alpine command: sh -c "yarn install && yarn run dev" ports: - 3000:3000 working_dir: /app volumes: - ./:/appIn Docker Compose volume definitions, you can use relative paths from the current directory.
version: "3.7" services: app: image: node:12-alpine command: sh -c "yarn install && yarn run dev" ports: - 3000:3000 working_dir: /app volumes: - ./:/app environment: MYSQL_HOST: mysql MYSQL_USER: root MYSQL_PASSWORD: <your-password> MYSQL_DB: todosdocker run -d --network todo-app --network-alias mysql -v todo-mysql-data:/var/lib/mysql -e MYSQL_ROOT_PASSWORD=<your-password> -e MYSQL_DATABASE=todos mysql:5.7Define the new service and name it mysql. Add your text after the
appdefinition, at the same level of indentation.YAMLCopy
version: "3.7" services: app: # The app service definition mysql: image: mysql:5.7The service automatically gets the network alias. Specify the image to use.
Define the volume mapping.
Specify the volume with a
volumes:section at the same level asservices:. Specify the volume mapping under the image.YAMLCopy
version: "3.7" services: app: # The app service definition mysql: image: mysql:5.7 volumes: - todo-mysql-data:/var/lib/mysql volumes: todo-mysql-data:Specify the environment variables.
YAMLCopy
version: "3.7" services: app: # The app service definition mysql: image: mysql:5.7 volumes: - todo-mysql-data:/var/lib/mysql environment: MYSQL_ROOT_PASSWORD: <your-password> MYSQL_DATABASE: todos volumes: todo-mysql-data:
At this point, the complete docker-compose.yml looks like this:
YAMLCopy
 version: "3.7"

 services:
   app:
     image: node:12-alpine
     command: sh -c "yarn install && yarn run dev"
     ports:
       - 3000:3000
working_dir: /app
volumes:
- ./:/app
environment:
MYSQL_HOST: mysql
MYSQL_USER: root
MYSQL_PASSWORD: <your-password>
MYSQL_DB: todos
mysql:
image: mysql:5.7
volumes:
- todo-mysql-data:/var/lib/mysql
environment:
MYSQL_ROOT_PASSWORD: <your-password>
MYSQL_DATABASE: todos
volumes:
todo-mysql-data:
docker-compose up -dThe
-dparameter makes the command run in the background.You should see output like the following results.
 Creating network "app_default" with the default driver
 Creating volume "app_todo-mysql-data" with default driver
 Creating app_app_1   ... done
 Creating app_mysql_1 ... done
In the Docker extension, right-click the app container and select View Logs. To view the logs from the command line, use the
docker logscommand.OutputCopy
 mysql_1  | 2019-10-03T03:07:16.083639Z 0 [Note] mysqld: ready for connections.
 mysql_1  | Version: '5.7.27'  socket: '/var/run/mysqld/mysqld.sock'  port: 3306  MySQL Community Server (GPL)
 app_1    | Connected to mysql db at host mysql
 app_1    | Listening on port 3000
At the command line, run
docker-compose down.
docker-compose down --volumes.
