Table of contents
- Fork this repository
- How to Fork a Repo in GitHub
- How to Integrate Your GitHub Repository to Your Jenkins Project
- DOCKER COMPOSE FILE
- Step 1: Define the application dependencies
- Step 2: Create a Dockerfile
- Step 3: Define services in a Compose file
- Step 4: Build and run your app with Compose
- Step 5: Edit the Compose file to add a bind mount
- Step 6: Re-build and run the app with Compose
- Step 7: Update the application
- Step 8: Experiment with some other commands
Fork this repository
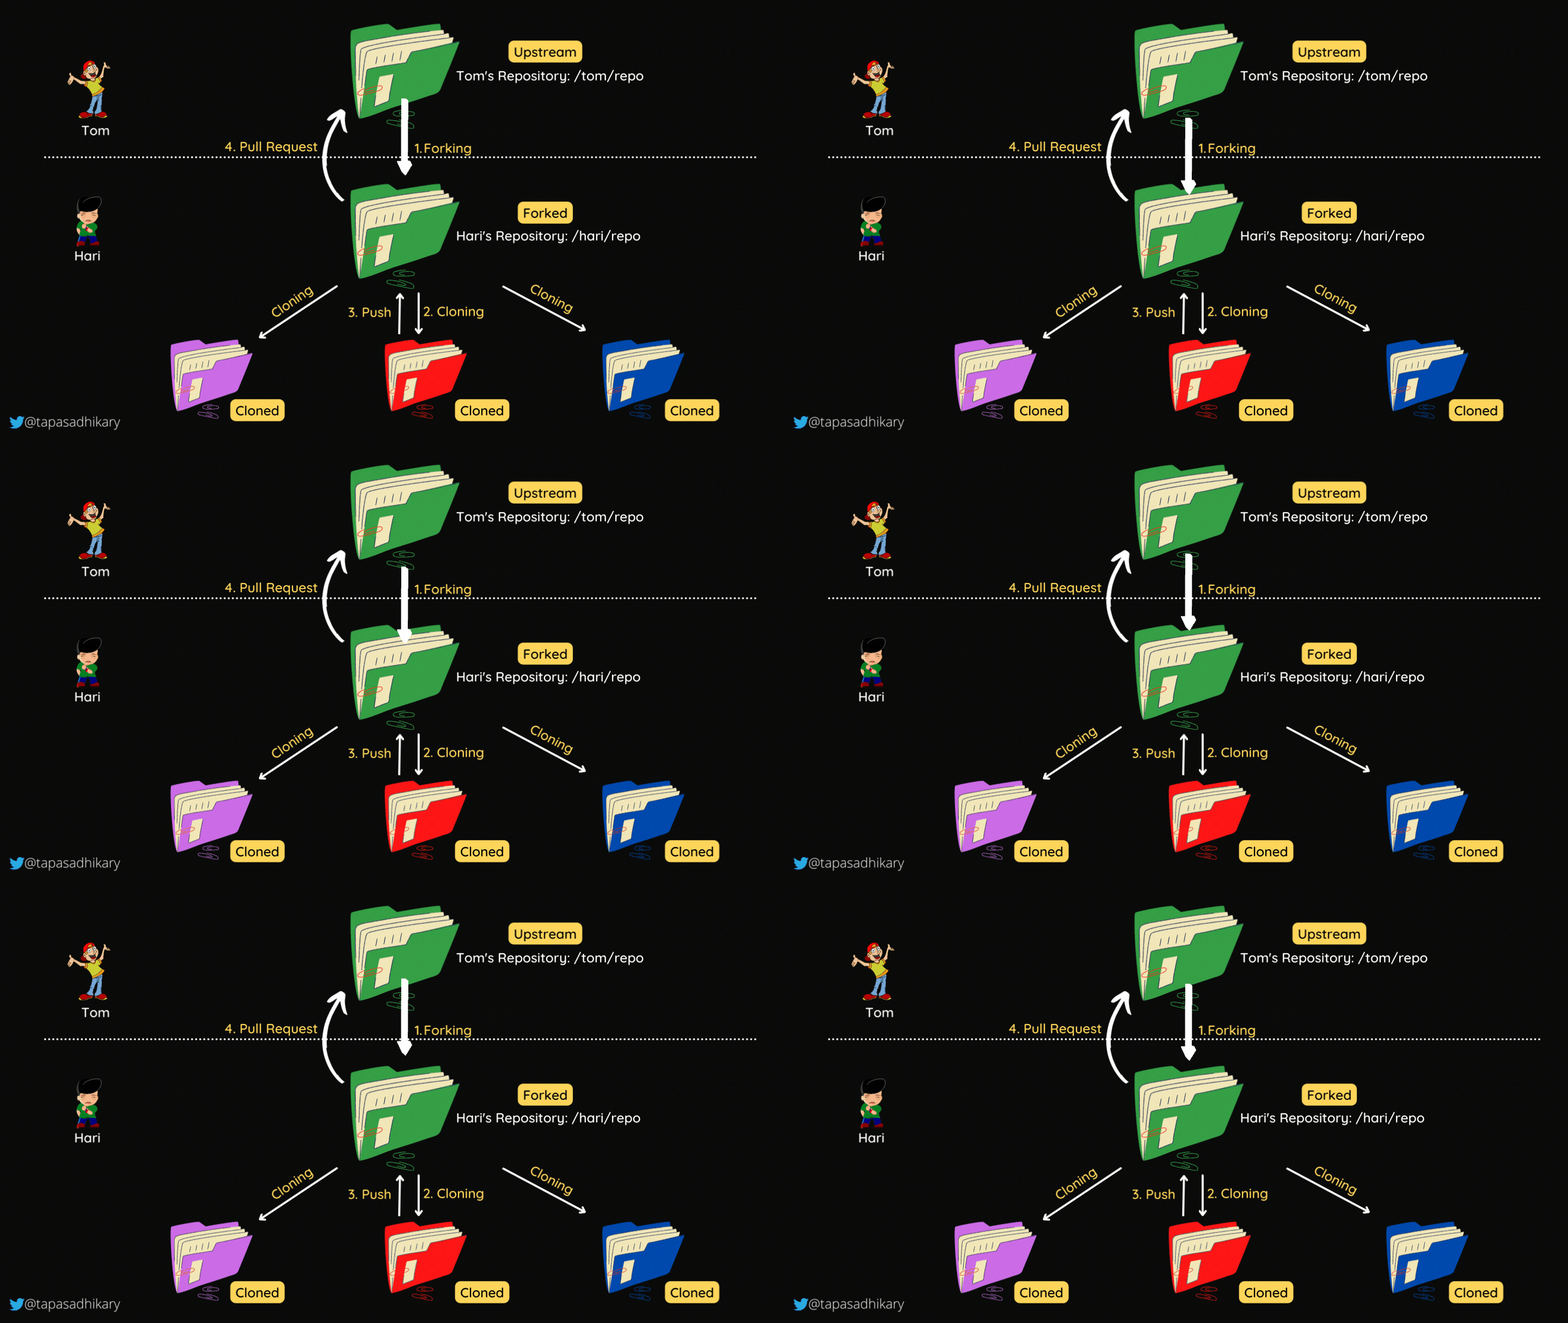
Workflow - Forking a Repository
How to Fork a Repo in GitHub

Browse to this public repository: https://github.com/90daysofdevops/fork-me
Create a folder with the same name .
Add a
Readme.mdfile inside the folder with any text of your choice.Create a
Pull Requestupstream. I shall review and merge it if all is well.
How to Integrate Your GitHub Repository to Your Jenkins Project
OPEN SOURCE AUTOMATION
By Guy Salton
Jenkins and GitHub are two powerful tools on their own, but what about using them together? In this blog, learn about the benefits of a Jenkins integration with GitHub and how to set up the integration on your own.
Table of Contents:
Can You Use Jenkins With GitHub?
You can and should use Jenkins with GitHub to save time and keep your project up-to-date.
One of the basic steps of implementing CI/CD is integrating your SCM (Source Control Management) tool with your CI tool. This saves you time and keeps your project updated all the time. One of the most popular and valuable SCM tools is GitHub.
📕 Related Reading: Explore Five Advantages Your Peers are Discovering with Continuous Testing >>
What is GitHub?
GitHub is a Git-based repository host, commonly used for open-source projects. GitHub enables code collaboration, hosting, and versioning.
What is Jenkins?
Jenkins is an open-source Continuous Integration and Continuous Deployment (CI/CD) tool for automating the software development life cycle (SDLC). With Jenkins testing, teams can automate the building, testing, and deploying of code.
Why Integrate GitHub + Jenkins?
A Jenkings integration with GitHub will improve the efficiency of building, testing, and deploying your code.
The integration presented in this blog post will teach you how to schedule your build, pull your code and data files from your GitHub repository to your Jenkins machine, and automatically trigger each build on the Jenkins server after each Commit on your Git repository.
But first, let’s configure the Jenkins and GitHub integration. Let's begin with the GitHub side!
Create a connection to your Jenkins job and your GitHub Repository via GitHub Integration.
How to Set Up the Jenkins + GitHub Integration
Configuring GitHub
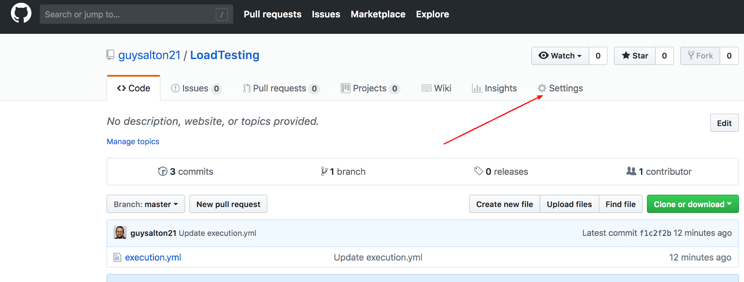
Step 1: go to your GitHub repository and click on ‘Settings’.
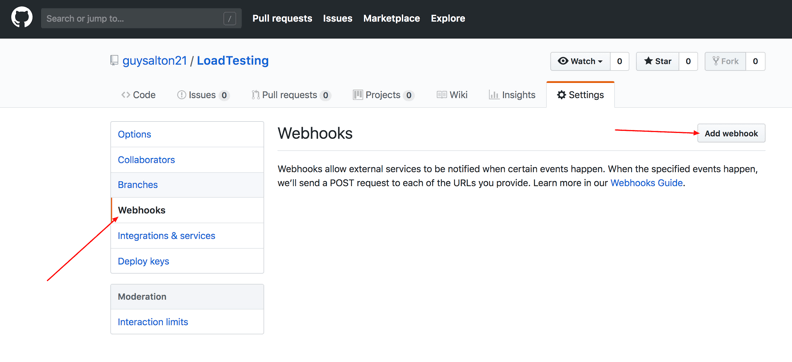
Step 2: Click on Webhooks and then click on ‘Add webhook’.
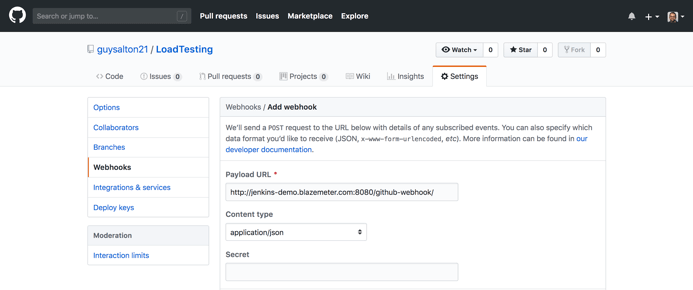
Step 3: In the ‘Payload URL’ field, paste your Jenkins environment URL. At the end of this URL add /github-webhook/. In the ‘Content type’ select: ‘application/json’ and leave the ‘Secret’ field empty.
Step 4: In the page ‘Which events would you like to trigger this webhook?’ choose ‘Let me select individual events.’ Then, check ‘Pull Requests’ and ‘Pushes’. At the end of this option, make sure that the ‘Active’ option is checked and click on ‘Add webhook’.
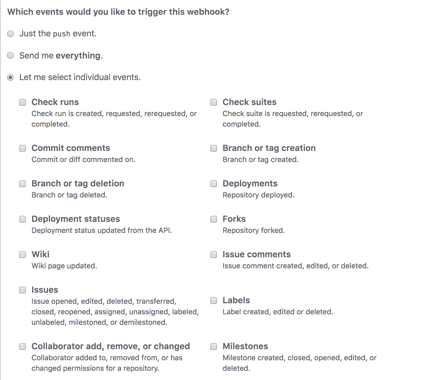
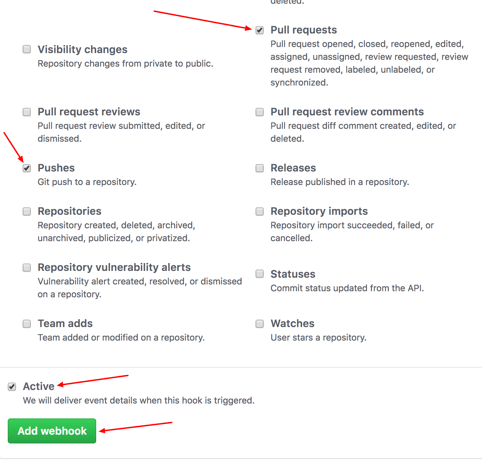
We're done with the configuration on GitHub’s side! Now let's move on to Jenkins.
Configuring Jenkins
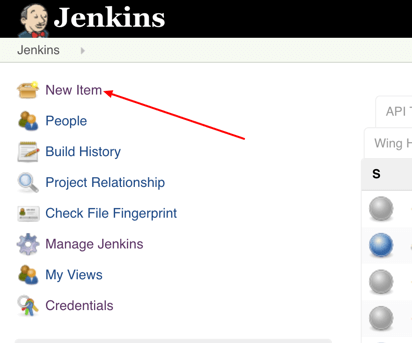
Step 5: In Jenkins, click on ‘New Item’ to create a new project.
Step 6: Give your project a name, then choose ‘Freestyle project’ and finally, click on ‘OK’.
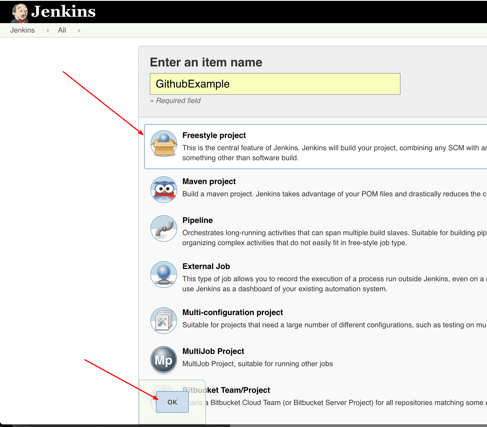
Step 7: Click on the ‘Source Code Management’ tab.
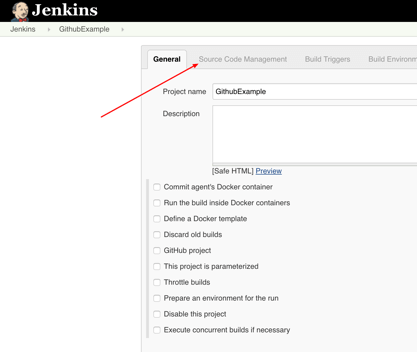
Step 8: Click on Git and paste your GitHub repository URL in the ‘Repository URL’ field.
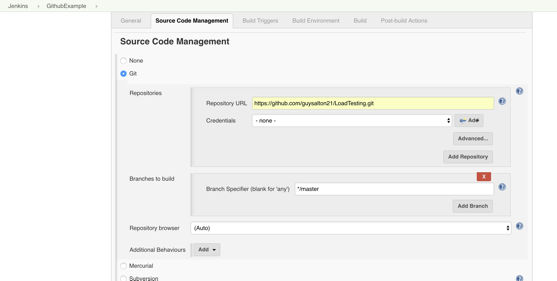
Step 9: Click on the ‘Build Triggers’ tab and then on the ‘GitHub hook trigger for GITScm polling’. Or, choose the trigger of your choice.
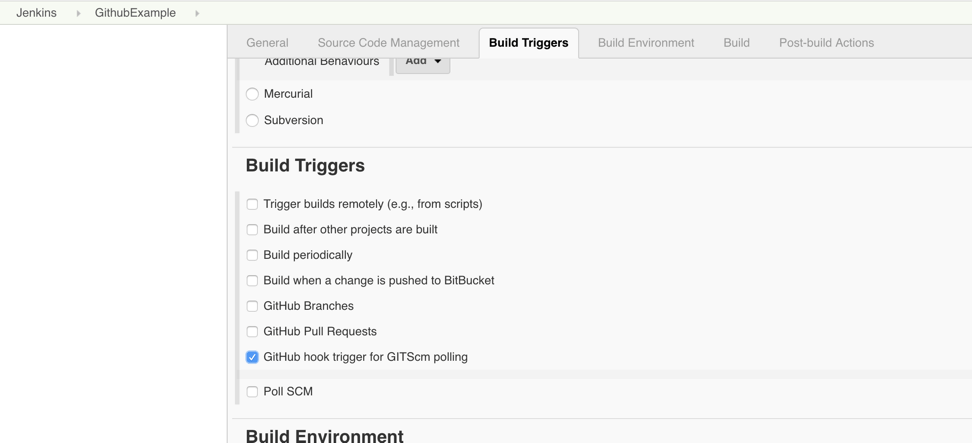
That's it! Your GitHub repository is integrated with your Jenkins project. With this Jenkins GitHub integration, you can now use any file found in the GitHub repository and trigger the Jenkins job to run with every code commit.
For example, I will show you how to run a Taurus script that I uploaded to my GitHub repository from my Jenkins project. Taurus is an open source load testing solution, enabling developers to run load testing scripts from sophisticated platforms like JMeter and Selenium, but with a simple YAML code.
Triggering the Jenkins GitHub Integration With Every Code Commit
Step 10: Click on the ‘Build’ tab, then click on ‘Add build step’ and choose ‘Execute shell’.
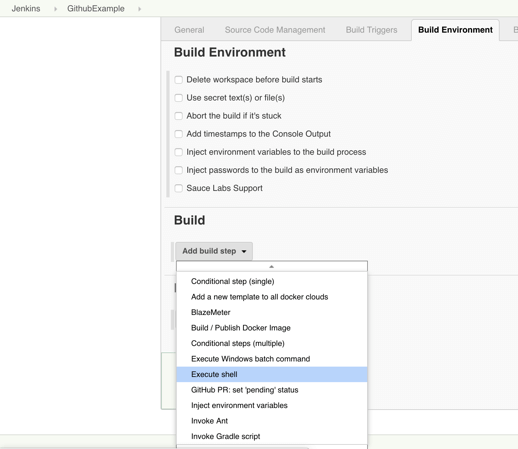
Step 11: To run a Taurus test, simply use the ‘bzt’ command, followed by the name of your YML file and click on ‘Save’.
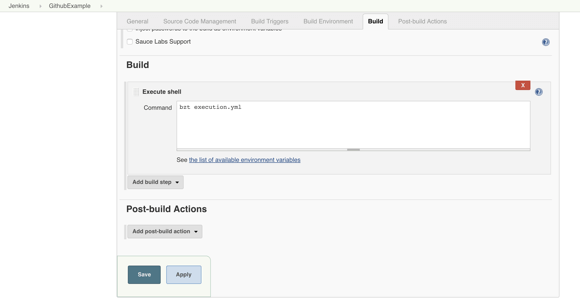
Step 12: Go back to your GitHub repository, edit the Taurus script and commit the changes. We will now see how Jenkins ran the script after the commit.
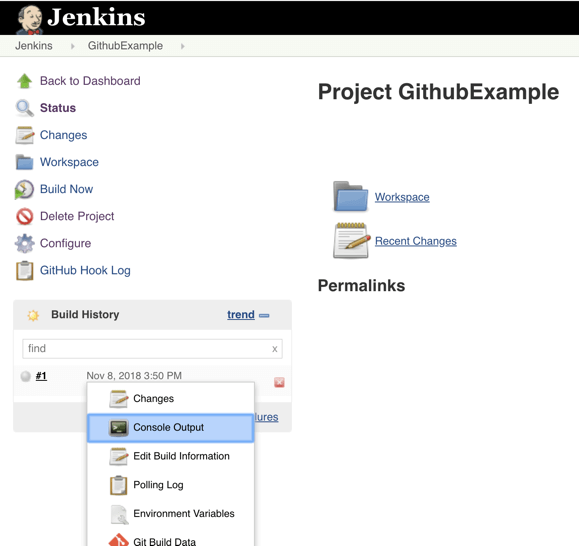
Step 13: Go back to your Jenkins project and you'll see that a new job was triggered automatically from the commit we made at the previous step. Click on the little arrow next to the job and choose ‘Console Output’.
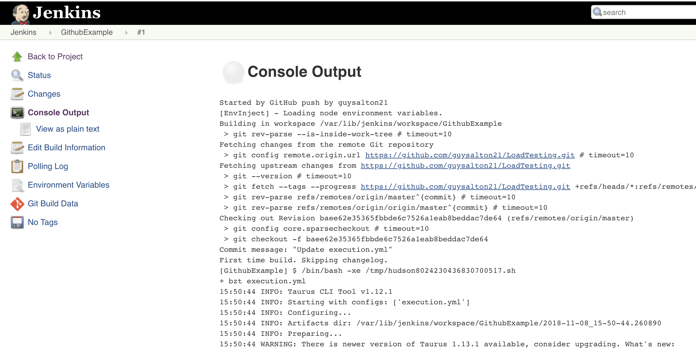
Step 14: You can see that Jenkins was able to pull the Taurus script and run it!
Github Webhook Tutorial
How to set up GitHub Webhooks
To begin the tutorial, let's take a look at the steps involved:
Clone the sample Node.js API for receiving GitHub webhooks on your development machine
Generate a webhook URL using the Hookdeck CLI
Register for a webhook on GitHub
Receive and inspect GitHub webhooks locally
Make some commits and view logs
How to integrate Docker with Jenkins builds
To integrate Docker into your Jenkins builds, follow these steps
Install Jenkins along with a DVCS tool such as Git
Install Docker
Add the Jenkins Docker plugin and Jenkins Docker pipeline plugin
Give group permissions so Jenkins can run Docker images
- sudo usermod -a -G docker jenkins
Reference Docker images in your Jenkinsfile builds
Docker in the Ubuntu terminal
The installation and configuration of Docker and Jenkins in Ubuntu requires an apt install command, a usermod command and, finally, a reboot call to ensure the usermod changes take effect:
sudo apt install docker.iosudo usermod -a -G docker jenkinsreboot
DOCKER COMPOSE FILE
  services:
    foo:
      image: foo
    bar:
      image: bar
      profiles:
        - test
    baz:
      image: baz
      depends_on:
        - bar
      profiles:
        - test
    zot:
      image: zot
      depends_on:
        - bar
      profiles:
        - debug
Step 1: Define the application dependencies
Create a directory for the project:
 $ mkdir composetest
 $ cd composetest
Create a file called
app.pyin your project directory and paste the following code in:import time import redis from flask import Flask app = Flask(__name__) cache = redis.Redis(host='redis', port=6379) def get_hit_count(): retries = 5 while True: try: return cache.incr('hits') except redis.exceptions.ConnectionError as exc: if retries == 0: raise exc retries -= 1 time.sleep(0.5) @app.route('/') def hello(): count = get_hit_count() return 'Hello World! I have been seen {} times.\n'.format(count)Step 2: Create a Dockerfile
The Dockerfile is used to build a Docker image. The image contains all the dependencies the Python application requires, including Python itself.
 # syntax=docker/dockerfile:1
 FROM python:3.7-alpine
 WORKDIR /code
 ENV FLASK_APP=app.py
 ENV FLASK_RUN_HOST=0.0.0.0
 RUN apk add --no-cache gcc musl-dev linux-headers
 COPY requirements.txt requirements.txt
 RUN pip install -r requirements.txt
 EXPOSE 5000
 COPY . .
 CMD ["flask", "run"]
Step 3: Define services in a Compose file
Create a file called docker-compose.yml in your project directory and paste the following:
    services:
      web:
        build: .
        ports:
          - "8000:5000"
      redis:
        image: "redis:alpine"
This Compose file defines two services: web and redis.
The web service uses an image that’s built from the Dockerfile in the current directory. It then binds the container and the host machine to the exposed port, 8000. This example service uses the default port for the Flask web server, 5000.
The redis service uses a public Redis image pulled from the Docker Hub registry.
Step 4: Build and run your app with Compose
From your project directory, start up your application by running
docker compose up.$ docker compose up
$ docker compose downStep 5: Edit the Compose file to add a bind mount
Edit
docker-compose.ymlin your project directory to add a bind mount for thewebservice:services: web: build: . ports: - "8000:5000" volumes: - .:/code environment: FLASK_DEBUG: "true" redis: image: "redis:alpine"The new
volumeskey mounts the project directory (current directory) on the host to/codeinside the container, allowing you to modify the code on the fly, without having to rebuild the image. Theenvironmentkey sets theFLASK_DEBUGenvironment variable, which tellsflask runto run in development mode and reload the code on change. This mode should only be used in development.
Step 6: Re-build and run the app with Compose
From your project directory, type docker compose up to build the app with the updated Compose file, and run it.
$ docker compose up
Step 7: Update the application
Because the application code is now mounted into the container using a volume, you can make changes to its code and see the changes instantly, without having to rebuild the image.
Change the greeting in app.py and save it. For example, change the Hello World! message to Hello from Docker!:
return 'Hello from Docker! I have been seen {} times.\n'.format(count)
Refresh the app in your browser. The greeting should be updated, and the counter should still be incrementing.
Step 8: Experiment with some other commands
If you want to run your services in the background, you can pass the -d flag (for “detached” mode) to docker compose up and use docker compose ps to see what is currently running:
$ docker compose up -d

Starting composetest_redis_1...
Starting composetest_web_1...

$ docker compose ps

       Name                      Command               State           Ports
-------------------------------------------------------------------------------------
composetest_redis_1   docker-entrypoint.sh redis ...   Up      6379/tcp
composetest_web_1     flask run                        Up      0.0.0.0:8000->5000/tcp
The docker compose run command allows you to run one-off commands for your services. For example, to see what environment variables are available to the web service:
$ docker compose run web env
See docker compose --help to see other available commands.
If you started Compose with docker compose up -d, stop your services once you’ve finished with them:
$ docker compose stop
You can bring everything down, removing the containers entirely, with the down command. Pass --volumes to also remove the data volume used by the Redis container:
$ docker compose down --volumes
