RHEL CH 9 to CH 14
https://goutamdevops.hashnode.dev/rhel-linuxch-1-to-ch8
PART III. INSTALLING AND MANAGING SOFTWARE
CHAPTER 9. YUM
Yum is the Red Hat package manager that is able to query for information about available packages, fetch packages from repositories, install and uninstall them, and update an entire system to the latest available version.
Yum performs automatic dependency resolution when updating, installing, or removing packages, and thus is able to automatically determine, fetch, and install all available dependent packages.
Yum is able to perform many of the same tasks that RPM can; additionally, many of the command-line options are similar.
Yum enables easy and simple package management on a single machine or on groups of them.
Checking For Updates
yum check-update
Updating Packages
Updating a Single Package
 yum update package_name
To update the rpm package, type:
~]# yum update rpm
it is possible to update a package group. Type as root:
yum group update group_name
Updating All Packages and Their Dependencies
yum update
Updating Security-Related Packages
yum update --security
You can also update packages only to versions containing the latest security updates. Type as root:
yum update-minimal --security
Automating Package Updating
To refresh the package database and download updates automatically, you can use the yum-cron service.
Upgrading the System Off-line with ISO and Yum
Create a target directory to mount your ISO image.
mkdir mount_dir
Replace mount_dir with a path to the mount directory. Typically, users create it as a subdirectory in the /media directory
Mount the Red Hat Enterprise Linux 7 installation ISO image to the previously created target directory. As root, type:
mount -o loop iso_name mount_dir
Copy the media.repo file from the mount directory to the /etc/yum.repos.d/ directory. Note that configuration files in this directory must have the .repo extension to function properly.
cp mount_dir/media.repo /etc/yum.repos.d/new.repo
Edit the new configuration file so that it points to the Red Hat Enterprise Linux installation ISO. Add the following line into the /etc/yum.repos.d/new.repo file:
baseurl=file:///mount_dir
Update all yum repositories including /etc/yum.repos.d/new.repo created in previous steps. As root, type:
yum update
This upgrades your system to the version provided by the mounted ISO image
After successful upgrade, you can unmount the ISO image. As root, type: /
umount mount_dir
where mount_dir is a path to your mount directory. Also, you can remove the mount directory
created in the first step. As root, type:
rmdir mount_dir
If you will not use the previously created configuration file for another installation or update, you can remove it. As root, type:
rm /etc/yum.repos.d/new.repo
WORKING WITH PACKAGES
You can search all RPM package names, descriptions and summaries by using the following command:
yum search term…
Replace term with a package name you want to search.
Example 9.4. Searching for packages matching a specific string
To list all packages that match "vim", "gvim", or "emacs", type:
~]$ yum search vim gvim emacs
Listing Packages
yum list all
To list installed and available packages that match inserted glob expressions use the following command:
yum list glob_expression…
Listing all installed versions of the krb package
~]$ yum list installed "krb?-*"
To list all packages in all enabled repositories that are available to install, use the command in the following form:
yum list available glob_expression…
Listing available gstreamer plug-ins
~]$ yum list available gstreamer*plugin\*
Listing Repositories
yum repolist
To list more information about these repositories, add the -v option. With this option enabled,
information including the file name, overall size, date of the last update, and base URL are displayed for
each listed repository.
yum repolist -v
yum repoinfo
To list both enabled and disabled repositories use the following command
yum repolist all
Displaying Package Information
yum info package_name…
~]$ yum info abrt
The yum info package_name command is similar to the rpm -q --info package_name
Using yumdb
yumdb info package_name
~]$ yumdb info yum
Installing Packages
yum install package_name
yum install package_name.arch
yum install package_name package_name…
Installing packages on multilib system
~]# yum install sqlite.i686
Installing all audacious plugins
~]# yum install audacious-plugins-\*
yum install-n name
yum install-na name.architecture
CHAPTER 9. YUM
103
yum install-nevra name-epoch:version-release.architecture
~]# yum provides "*bin/named"
Removing Packages
yum remove package_name…
Removing several packages
~]# yum remove totem
WORKING WITH PACKAGE GROUPS
Listing Package Groups
yum groups summary
yum group list glob_expression…
yum group info glob_expression…
~]$ yum group info LibreOffice
Installing a Package Group
yum group list ids
~]$ yum group list ids kde\*
You can install a package group by passing its full group name, without the groupid part, to the group install command. As root, type:
yum group install "group name"
You can also install by groupid. As root, execute the following command:
yum group install groupid
You can pass the groupid or quoted group name to the install command if you prepend it with an @ symbol, which tells yum that you want to perform group install. As root, type:
yum install @group
yum install @^group
Four equivalent ways of installing the KDE Desktop group
~]# yum group install "KDE Desktop"
~]# yum group install kde-desktop
~]# yum install @"KDE Desktop"
~]# yum install @kde-desktop
Removing a Package Group
yum group remove group_name
yum group remove groupid
yum remove @group
yum remove @^group
~]# yum group remove "KDE Desktop"
~]# yum group remove kde-desktop
~]# yum remove @"KDE Desktop"
~]# yum remove @kde-desktop
WORKING WITH TRANSACTION HISTORY
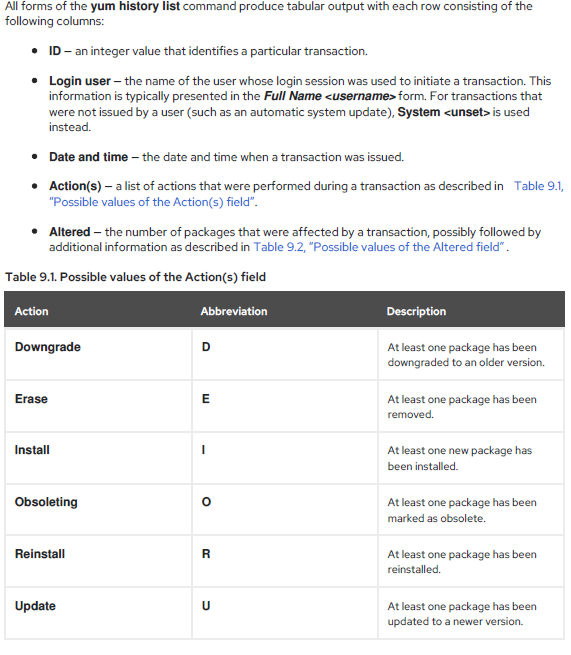
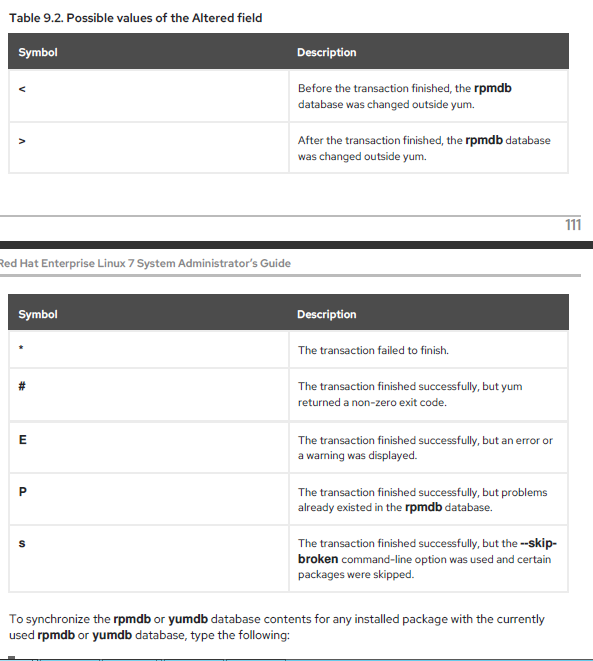
All history data is stored in the history DB in the
/var/lib/yum/history/ directory
Listing Transactions
To display a list of the twenty most recent transactions,
yum history list
To display all transactions, add the all keyword:
yum history list all
To display only transactions in a given range, use the command in the following form:
yum history list start_id..end_id
yum history list glob_expression…
Listing the five oldest transactions
~]# yum history list 1..5
To synchronize the rpmdb or yumdb database contents for any installed package with the currently used rpmdb or yumdb database, type the following
yum history sync
To display some overall statistics about the currently used history database use the following command:
yum history stats
Yum also enables you to display a summary of all past transactions. To do so, run the command in the
following form as root:
yum history summary
To display only transactions in a given range, type:
yum history summary start_id..end_id
~]# yum history summary 1..5
Examining Transactions
yum history summary id(single)
yum history info id…
yum history info start_id..end_id
~]# yum history info 4..5
yum history addon-info id
Similarly to yum history info, when no id is provided, yum automatically uses the latest transaction.
Another way to refer to the latest transaction is to use the last keyword:
yum history addon-info last
Example output of yum history addon-info
~]# yum history addon-info 4
Reverting and Repeating Transactions
To revert a transaction, type the following at a shell prompt as root:
yum history undo id
To repeat a particular transaction, as root, run the following command:
yum history redo id
To store the transaction details to a file, type the following at a shell
prompt as root:
yum -q history addon-info id saved_tx > file_name
yum load-transaction file_name
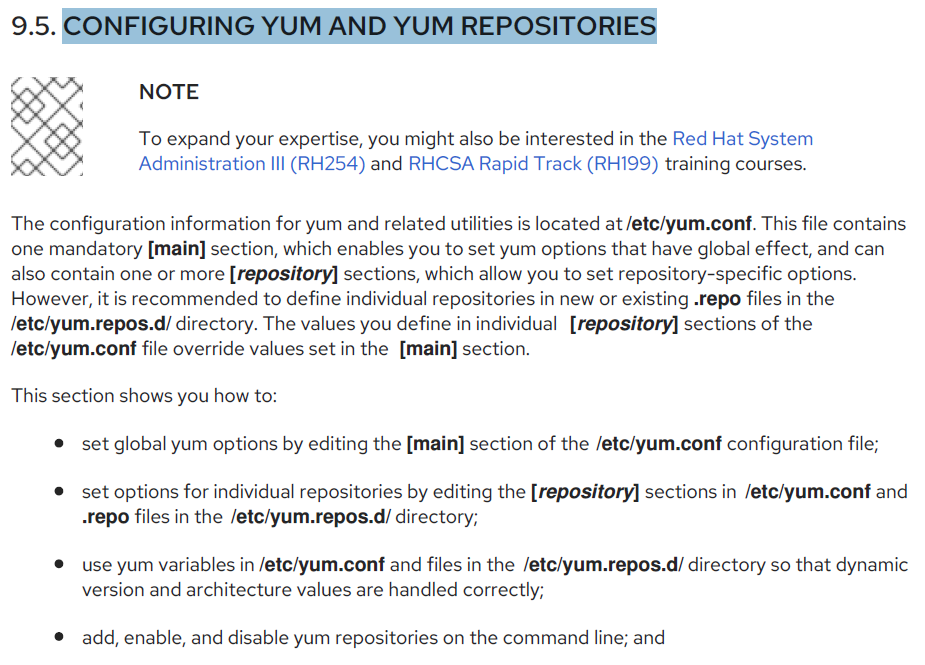
Starting New Transaction History
yum history new(/var/lib/yum/history)
PART IV. INFRASTRUCTURE SERVICES
MANAGING SERVICES WITH SYSTEMD
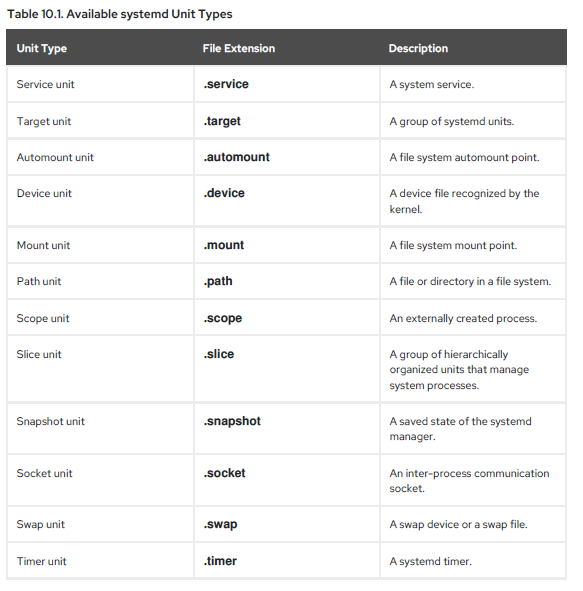
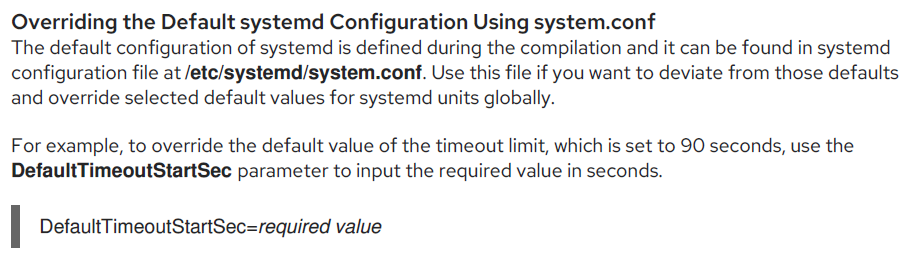
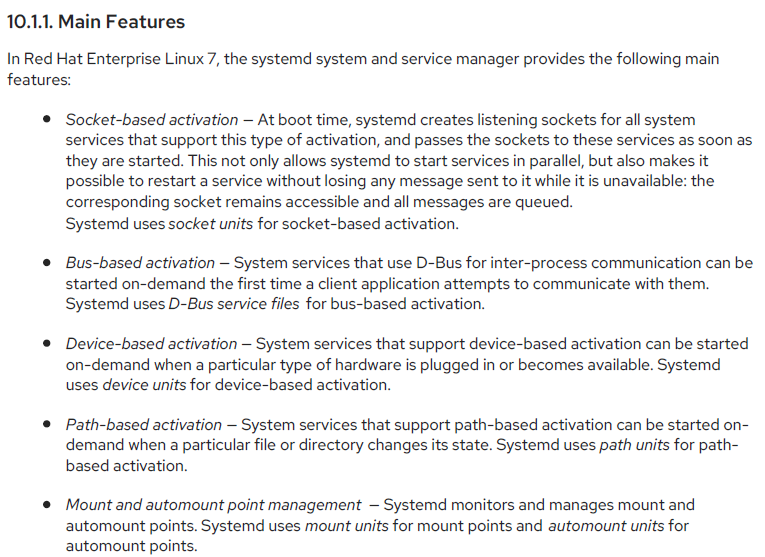
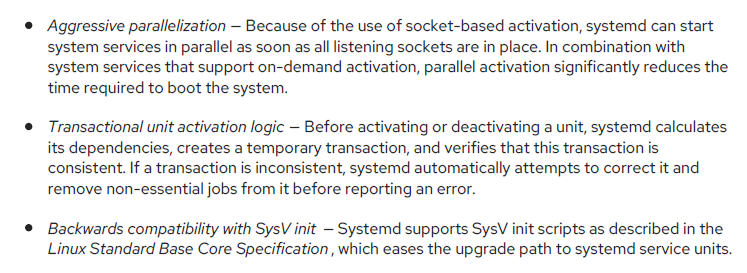
Systemd is a system and service manager for Linux operating systems. It is designed to be backwards compatible with SysV init scripts, and provides a number of features such as parallel startup of system services at boot time, on-demand activation of daemons, or dependency-based service control logic.
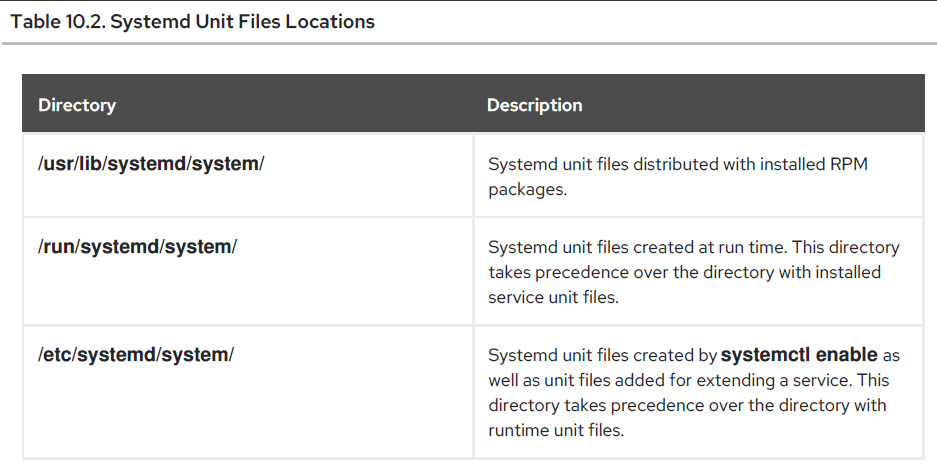
Systemd introduces the concept of systemd units. These units are represented by unit configuration files located in one of the directories listed in Table 10.2, *“*Systemd Unit Files Locations” , and encapsulate information about system services, listening sockets, and other objects that are relevant to the init system.
MANAGING SYSTEM SERVICES
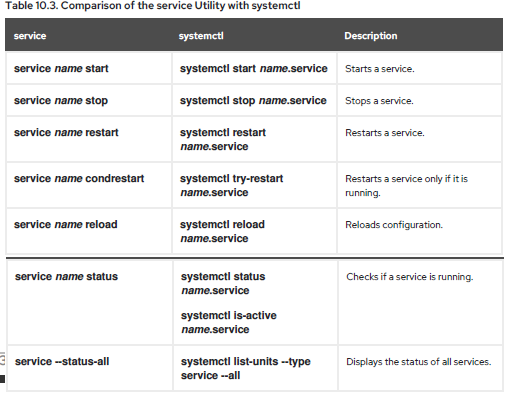
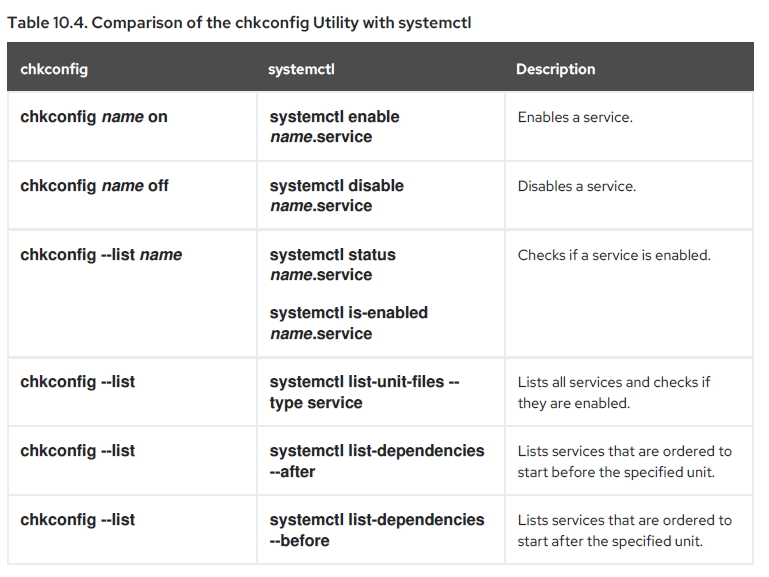
Specifying Service Units For clarity, all command examples in the rest of this section use full unit names with the .service file extension, for example:
~]# systemctl stop nfs-server.service
However, the file extension can be omitted, in which case the systemctl utility assumes the argument is a service unit. The following command is equivalent to the one above:
~]# systemctl stop nfs-server
Additionally, some units have alias names. Those names can have shorter names than units, which can be used instead of the actual unit names. To find all aliases that can be used for a particular unit,
~]# systemctl show nfs-server.service -p Names
The exception to this are unit file commands such as the systemctl enable and systemctl disable commands. These commands do not need a running system and do not affect running processes, but they do affect unit files. Therefore, you can run these commands even in chroot environment. For example, to enable the httpd service on a system under the /srv/website1/ directory:
~]# chroot /srv/website1

~]# systemctl enable httpd.service
Created symlink /etc/systemd/system/multi-user.target.wants/httpd.service, pointing to /usr/lib/systemd/system/httpd.service
Listing Services
systemctl list-units --type service
systemctl list-units --type service --all(or a)
You can also list all available service units to see if they are enabled. To do so, type:
systemctl list-unit-files --type service
To list all currently loaded service units, run the following command:
~]$ systemctl list-units --type service
To list all installed service unit files to determine if they are enabled, type:
~]$ systemctl list-unit-files --type service
Displaying Service Status
systemctl status name.service
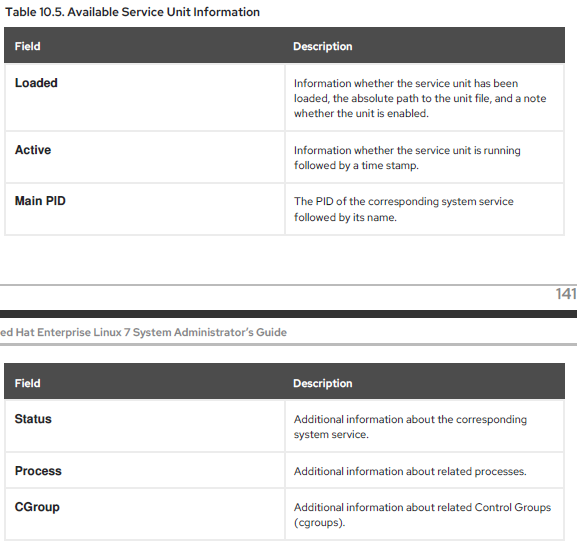
To only verify that a particular service unit is running, run the following command:
systemctl is-active name.service
Similarly, to determine whether a particular service unit is enabled, type:
systemctl is-enabled name.service
~]# systemctl status gdm.service
Displaying Services Ordered to Start Before a Service
~]# systemctl list-dependencies --after gdm.service
Displaying Services Ordered to Start After a Service
~]# systemctl list-dependencies --before gdm.service
Starting a Service
 systemctl start name.service
~]# systemctl start httpd.service
Stopping a Service
systemctl stop name.service
~]# systemctl stop bluetooth.service

Restarting a Service
systemctl restart name.service
systemctl try-restart name.service(services also allow you to reload their configuration without interrupting their execution.)
systemctl reload name.service(without interuption)

Enabling a Service
systemctl enable name.service
systemctl reenable name.service(/usr/lib/systemd/system/name.service file in the /etc/systemd/system/ directory and its
subdirectories.)
Ensure that the symbolic links are re-created, use the following command as root:
systemctl reenable name.service

Disabling a Service
systemctl disable name.service
In addition, you can mask any service unit to prevent it from being started manually or by
another service. To do so, run the following command as root:
systemctl mask name.service
systemctl unmask name.service
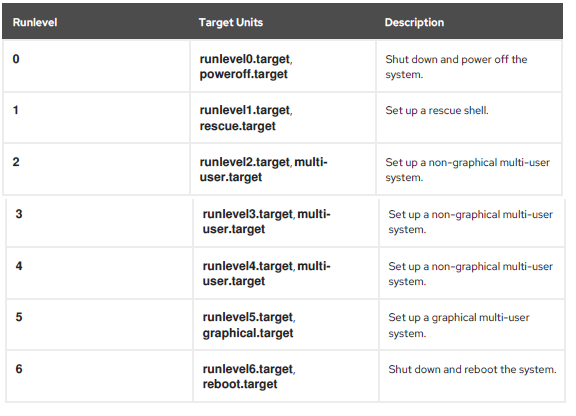
Viewing the Default Target
To determine which target unit is used by default, run the following command:
systemctl get-default
(/etc/systemd/system/default.target)
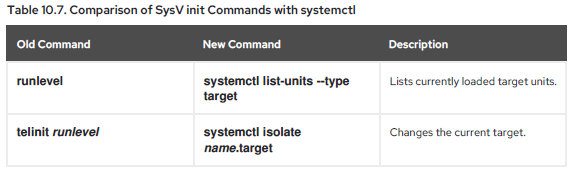
Viewing the Current Target
CHAPTER 10. MANAGING SERVICES WITH SYSTEMD
systemctl list-units --type target
systemctl list-units --type target --all
Changing the Default Target
 systemctl set-default name.target
~]# systemctl set-default multi-user.target
rm '/etc/systemd/system/default.target'
ln -s '/usr/lib/systemd/system/multi-user.target' '/etc/systemd/system/default.target'
Changing the Current Target
systemctl isolate name.target
~]# systemctl isolate multi-user.target
Changing to Rescue Mode
systemctl rescue
systemctl isolate rescue.target
systemctl --no-wall rescue
Changing to Rescue Mode
Changing to Emergency Mode
systemctl emergency
same as systemctl isolate emergency.target
~]# systemctl --no-wall emergency
SHUTTING DOWN, SUSPENDING, AND HIBERNATING THE SYSTEM
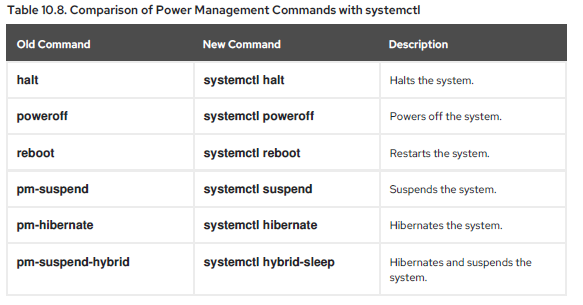
By default, running either of these commands causes systemd to send an informative message to all users that are currently logged into the system. To prevent systemd from sending this message, run the selected command with the --no-wall command line option, for example:
systemctl --no-wall poweroff
To shut down the system and power off the machine at a certain time,
shutdown --poweroff hh:mm
To shut down and halt the system after a delay, without powering off the machine, use a command in
the following format as root:
shutdown --halt +m
Where +m is the delay time in minutes. The now keyword is an alias for +0.
A pending shutdown can be canceled by the root user as follows:
shutdown -c
To prevent systemd from sending this message,
systemctl --no-wall reboot
Suspending the System
systemctl suspend
Hibernating the System
systemctl hibernate
To hibernate and suspend the system, run the following command as root:
systemctl hybrid-sleep
CONTROLLING SYSTEMD ON A REMOTE MACHINE
systemctl --host user_name@host_name command
Remote Management
~]$ systemctl -H root@server-01.example.com status httpd.service
>>>>>>> systemd unit files -- update
root@server-01.example.com's password:
httpd.service - The Apache HTTP Server
Loaded: loaded (/usr/lib/systemd/system/httpd.service; enabled)
Active: active (running) since Fri 2013-11-01 13:58:56 CET; 2h 48min ago
Main PID: 649
Status: "Total requests: 0; Current requests/sec: 0; Current traffic: 0 B/sec"
CGroup: /system.slice/httpd.service
CREATING AND MODIFYING SYSTEMD UNIT FILES
Table 10.2, “Systemd Unit Files Locations” lists three main directories where unit files are stored on the system, the /etc/systemd/system/ directory is reserved for unit files created or customized by the system administrator.
Unit file names take the following form: unit_name.type_extension
sshd.service, sshd.service.d/custom.conf,sshd.socket
Understanding the Unit File Structure
Creating the emacs.service File
Create a unit file in the /etc/systemd/system/ directory and make sure it has the correct file permissions. Execute as root:
~]# touch /etc/systemd/system/emacs.service
~]# chmod 664 /etc/systemd/system/emacs.service
Execute the following commands to reload the configuration and start the custom service:
~]# systemctl daemon-reload
~]# systemctl start emacs.service
Creating a second instance of the sshd service
Create a copy of the sshd_config file that will be used by the second daemon:
~]# cp /etc/ssh/sshd{,-second}_config
Create a copy of the systemd unit file for the sshd service:
~]# cp /usr/lib/systemd/system/sshd.service /etc/systemd/system/sshd-second.service
~]# semanage port -a -t ssh_port_t -p tcp 22220
Enable sshd-second.service, so that it starts automatically upon boot:
~]# systemctl enable sshd-second.service
~]$ ssh -p 22220 user@server
CHAPTER 12. OPENSSH
SSH (Secure Shell) is a protocol which facilitates secure communications between two systems using a client-server architecture and allows users to log in to server host systems remotely. Unlike other remote communication protocols, such as FTP or Telnet, SSH encrypts the login session, rendering the connection difficult for intruders to collect unencrypted passwords.
Why Use SSH?
Interception of communication between two systems :
The attacker can be somewhere on the network between the communicating parties, copying any information passed between them. He may intercept and keep the information, or alter the information and send it on to the intended recipient. This attack is usually performed using a packet sniffer, a rather common network utility that captures each packet flowing through the network, and analyzes its content.
Impersonation of a particular host
Attacker’s system is configured to pose as the intended recipient of a transmission. If this strategy works, the user’s system remains unaware that it is communicating with the wrong host. This attack can be performed using a technique known as DNS poisoning , or via so-called IP spoofing. In the first case, the intruder uses a cracked DNS server to point client systems to a maliciously duplicated host. In the second case, the intruder sends falsified network packets that appear to be from a trusted host.
Main Features
No one can pose as the intended server
*No one can capture the authentication information(*The client transmits its authentication information to the server using strong, 128-bit encryption)
No one can intercept the communication
It provides secure means to use graphical applications over a network
It provides a way to secure otherwise insecure protocols
It can be used to create a secure channel
It supports the Kerberos authentication( OpenSSH servers and clients can be configured to authenticate using the GSSAPI (Generic Security Services Application Program Interface) implementation of the Kerberos network authentication protocol.)
CONFIGURING OPENSSH
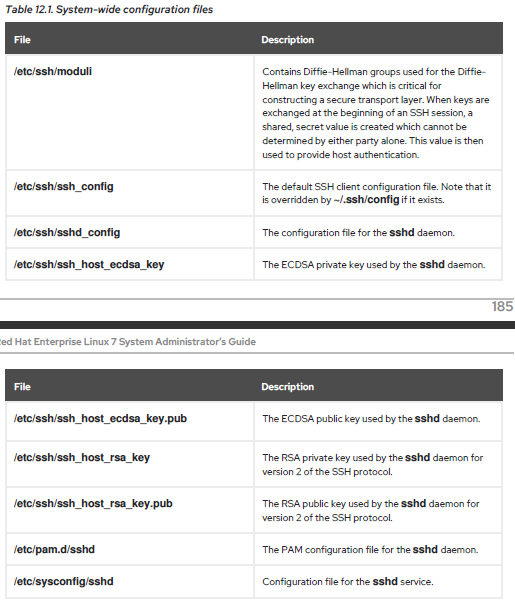
There are two different sets of configuration files: those for client programs (that is, ssh, scp, and sftp), and those for the server (the sshd daemon).
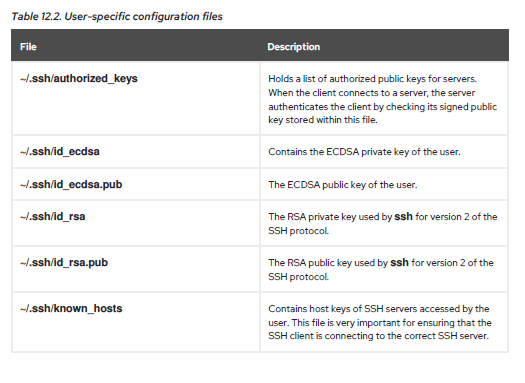
~]# systemctl start sshd.service
~]# systemctl stop sshd.service
~]# systemctl enable sshd.service
Using Key-based Authentication
PasswordAuthentication no
~]# setsebool -P use_nfs_home_dirs 1
Generating Key Pairs To generate an RSA key pair for version 2 of the SSH protocol, follow these steps:
Generate an RSA key pair by typing the following at a shell prompt:
 ~]$ ssh-keygen -t rsa
 ~/.ssh/id_rsa
To copy the public key to a remote machine, issue a command in the following format:
 ssh-copy-id user@hostname

 ssh-copy-id -i ~/.ssh/id_rsa.pub user@hostname
 1. Generate an ECDSA key pair by typing the following at a shell prompt:
 ~]$ ssh-keygen -t ecdsa
 Generating public/private ecdsa key pair.
 Enter file in which to save the key (/home/USER/.ssh/id_ecdsa):
 2. Press Enter to confirm the default location, ~/.ssh/id_ecdsa, for the newly created key.
Using the scp Utility
scp can be used to transfer files between machines over a secure, encrypted connection. In its design, it is very similar to rcp.
scp localfile username@hostname:remotefileUsing the sftp Utility
The sftp utility can be used to open a secure, interactive FTP session. In its design, it is similar to ftp except that it uses a secure, encrypted connection.
sftp username@hostname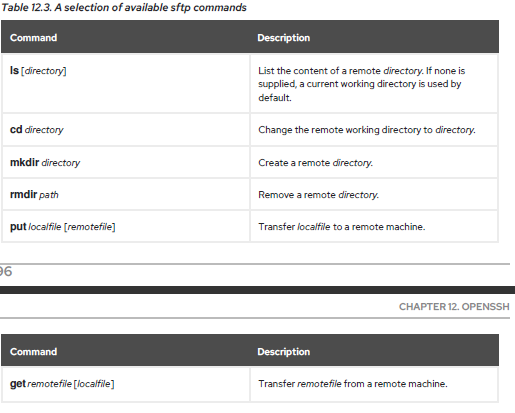
MORE THAN A SECURE SHELL
 To open an X11 session over an SSH connection, use a command in the following form:
 ssh -Y username@hostname
 ~]$ ssh -Y USER@penguin.example.com
 USER@penguin.example.com's password:
 ~]# yum group install "X Window System"
 ~]$ system-config-printer &
Port Forwarding
SSH can secure otherwise insecure TCP/IP protocols via port forwarding. When using this technique, the SSH server becomes an encrypted conduit to the SSH client.
Port forwarding works by mapping a local port on the client to a remote port on the server. SSH can map any port from the server to any port on the client. Port numbers do not need to match for this technique to work.
    To create a TCP/IP port forwarding channel which listens for connections on the localhost, use a command in the following form:
     ssh -L local-port:remote-hostname:remote-port username@hostname
    ~]$ ssh -L 1100:mail.example.com:110 mail.example.com
    ~]$ ssh -L 1100:mail.example.com:110 other.example.com
    ~]$ ssh -L /var/mysql/mysql.sock:/var/mysql/mysql.sock username@hostname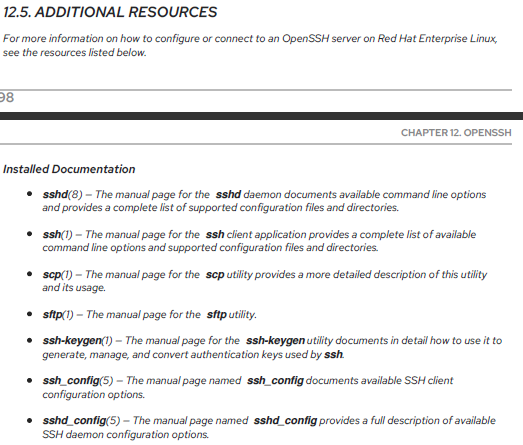
CHAPTER 13. TIGERVNC TigerVNC
TigerVNC (Tiger Virtual Network Computing) is a system for graphical desktop sharing which allows you to remotely control other computers.
TigerVNC works on the client-server principle: a server shares its output ( vncserver) and a client (vncviewer) connects to the server.
Unlike in previous Red Hat Enterprise Linux distributions, TigerVNC in Red Hat Enterprise Linux 7 uses the systemd system management daemon for its configuration.
The /etc/sysconfig/vncserver configuration file has been replaced by /etc/systemd/system/vncserver@.service. VNC SERVER
vncserver is a utility which starts a VNC (Virtual Network Computing) desktop. It runs Xvnc with appropriate options and starts a window manager on the VNC desktop. vncserver allows users to run separate sessions in parallel on a machine which can then be accessed by any number of clients from anywhere.
Installing and Confifiguring VNC Server
~]# yum install tigervnc-server
Configuring a VNC Display for a Single User
A configuration file named /etc/systemd/system/vncserver@.service is required. To create this file, copy the /usr/lib/systemd/system/vncserver@.service file as root:
~]# cp /usr/lib/systemd/system/vncserver@.service
/etc/systemd/system/vncserver@.service

Edit /etc/systemd/system/vncserver@.service, replacing USER with the actual user name.
Leave the remaining lines of the file unmodified.

ExecStart=/usr/bin/vncserver_wrapper <USER> %i
NOTE The default size of the VNC desktop is 1024x768. A user’s VNC session can be further configured using the ~/.vnc/config file. For example, to change the VNC window size, add the following line: geometry= x
Save the changes.
To make the changes take effect immediately, issue the following command:
systemctl daemon-reload
Set the password for the user or users defined in the configuration file. Note that you need to
switch from root to USER first.
~]# su - USER
~]$ vncpasswd
Password:
Verify:
Configuring VNC Server for Two Users
Create two service files, for example vncserver-USER_1@.service and vncserver-USER_2@.service. In both these files substitute USER with the correct user name.
Set passwords for both users:
~]$ su - USER_1
~]$ vncpasswd
Password:
Verify:
~]$ su - USER_2
~]$ vncpasswd
Password:
Verify:
Starting VNC Server
~]# systemctl start vncserver@:display_number.service
~]# systemctl enable vncserver@:display_number.service
Configuring VNC Server for Two Users and Two Different Displays
~]# systemctl start vncserver-USER_1@:3.service
~]# systemctl start vncserver-USER_2@:5.service
VNC setup based on xinetd with XDMCP for GDM
VNC setup based on xinetd with X Display Manager Control Protocol (XDMCP) for GDM is a useful setup for client systems that consist mainly of thin clients. After the setup, clients are able to access the GDM login window and log in to any system account. The prerequisite for the setup is that the gdm, vnc, vncserver & and xinetd packages are installed.
~]# yum install gdm tigervnc tigervnc-server xinetd
~]# systemctl enable xinetd.service
~]# systemctl get-default
~]# systemctl set-default target_name
Accessing the GDM login window and logging in
Set up GDM to enable XDMCP by editing the /etc/gdm/custom.conf configuration file:
[xdmcp]
Enable=true

Create a file called /etc/xinetd.d/xvncserver with the following content:
service service_name
{
disable = no
protocol = tcp
socket_type = stream
wait = no
user = nobody
server = /usr/bin/Xvnc
server_args = -inetd -query localhost -once -geometry selected_geometry -depth
selected_depth securitytypes=none
}

Edit file /etc/services to have the service defined. To do this, append the following snippet to the
/etc/services file:
# VNC xinetd GDM base
service_name 5950/tcp
To ensure that the configuration changes take effect, reboot the machine.
Alternatively, you can run the following. Change init levels to 3 and back to 5 to force gdm to
reload.
# init 3
# init 5

Verify that gdm is listening on UDP port 177.
# netstat -anu|grep 177
udp 0 0 0.0.0.0:177 0.0.0.0:*
Restart the xinetd service.
~]# systemctl restart xinetd.service

Verify that the xinetd service has loaded the new services.
# netstat -anpt|grep 595
tcp 0 0 :::5950 :::* LISTEN 3119/xinetd

Test the setup using a vncviewer command:
# vncviewer localhost:5950
Configure firewall for the setup. Run the firewall configuration tool and add TCP port 5950 to allow
incoming connections to the system.
~]# firewall-cmd --permanent --zone=public --add-port=5950/tcp
~]# firewall-cmd --reload
Terminating a VNC Session
~]# systemctl disable vncserver@:display_number.service
~]# systemctl stop vncserver@:display_number.service
Sharing an X Desktop
To share the desktop of a logged in user, using the x0vncserver, proceed as follows:
Enter the following command as root
~]# yum install tigervnc-serverSet the VNC password for the user:
~]$ vncpasswd Password: Verify:Enter the following command as that user:
~]$ x0vncserver -PasswordFile=.vnc/passwd -AlwaysShared=1VNC VIEWER
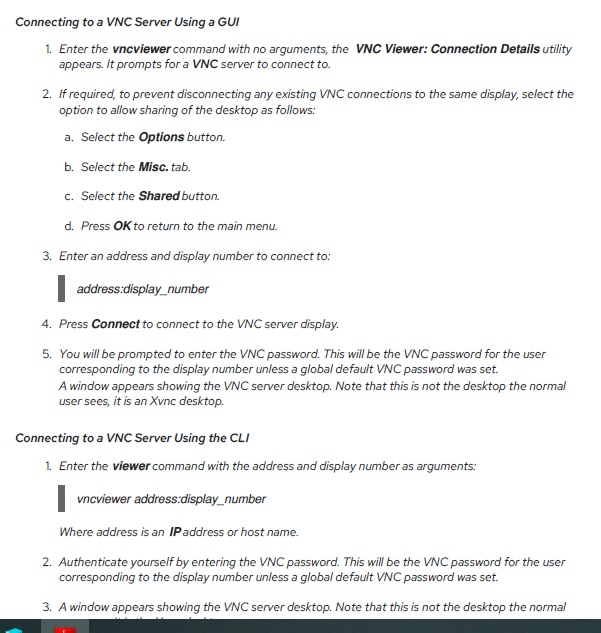
vncviewer is a program which shows the graphical user interfaces and controls the vncserver remotely.Enter vncviewer -h on the command line to list vncviewer's parameters.
Installing VNC Viewer
~]# yum install tigervnc
Configuring the Firewall for VNC
When using a non-encrypted connection, firewalld might block the connection. To allow firewalld to pass the VNC packets, you can open specific ports to TCP traffic. When using the -via option, traffic is redirected over SSH which is enabled by default in firewalld.
Note:The default port of VNC server is 5900. To reach the port through which a remote desktop will be accessible, sum the default port and the user’s assigned display number. For example, for the second display: 2 + 5900 = 5902.
Enabling VNC Service in firewalld
1. Run the following command to see the information concerning firewalld settings:
~]$ firewall-cmd --list-all

2. To allow all VNC connections from a specific address, use a command as follows:
~]# firewall-cmd --add-rich-rule='rule family="ipv4" source address="192.168.122.116"
service name=vnc-server accept'
success
Note that these changes will not persist after the next system start. To make permanent changes
to the firewall, repeat the commands adding the --permanent option. See the Red Hat Enterprise
Linux 7 Security Guide for more information on the use of firewall rich language commands.

3. To verify the above settings, use a command as follows:
~]# firewall-cmd --list-all
public (default, active)
interfaces: bond0 bond0.192
sources:
services: dhcpv6-client ssh
ports:
masquerade: no
forward-ports:
icmp-blocks:
rich rules:
rule family="ipv4" source address="192.168.122.116" service name="vnc-server" accept
To open a specific port or range of ports make use of the --add-port option to the firewall-cmd
command Line tool. For example, VNC display 4 requires port 5904 to be opened for TCP traffic.
Opening Ports in firewalld
~]# firewall-cmd --zone=public --add-port=5904/tcp
success
To view the ports that are currently open for the public zone, issue a command as follows:
~]# firewall-cmd --zone=public --list-ports
5904/tc
A port can be removed using the firewall-cmd --zone=zone --remove-port=number/protocol command.
Connecting to VNC Server Using SSH
vncviewer -via user@host:display_number
To connect to a VNC server using SSH, enter a command as follows:
~]$ vncviewer -via USER_2@192.168.2.101:3
2. When you are prompted to, type the password, and confirm by pressing Enter.
3. A window with a remote desktop appears on your screen.

Restricting VNC Access
If you prefer only encrypted connections, you can prevent unencrypted connections altogether by using
the -localhost option in the systemd.service file, the ExecStart line:
ExecStart=/usr/sbin/runuser -l user -c "/usr/bin/vncserver -localhost %i"
ADDITIONAL RESOURCES For more information about TigerVNC, see the resources listed below. Installed Documentation
vncserver(1) — The manual page for the VNC server utility.
vncviewer(1) — The manual page for the VNC viewer.
vncpasswd(1) — The manual page for the VNC password command.
Xvnc(1) — The manual page for the Xvnc server configuration options.
x0vncserver(1) — The manual page for the TigerVNC server for sharing existing X servers.
CHAPTER 14. WEB SERVERS
A web server is a network service that serves content to a client over the web. This typically means web pages, but any other documents can be served as well. Web servers are also known as HTTP servers, as they use the hypertext transport protocol (HTTP).
The web servers available in Red Hat Enterprise Linux 7 are:
Apache HTTP Server
nginx
THE APACHE HTTP SERVER(httpd)
httpd Service Control
With the migration away from SysV init scripts, server administrators should switch to using the apachectl and systemctl
service httpd graceful
is replaced by
apachectl graceful
A graceful restart is used by default when the service is reloaded.
A graceful stop is used by default when the service is stopped.

service httpd configtest
Red Hat Enterprise Linux 7 System Administrator’s Guide
210
is replaced by
apachectl configtest
HTTP Daemon is a software program that runs in the background of a web server and waits for the incoming servers requests.
The daemon answer the request automatically and serves the hypertext and multimedia documents over the internet using HTTP.
Configuring the Static Website using httpd
yum install httpd
Config Locations:
/etc/httpd/conf/htpd.conf
/var/www/html/index.html(you need to add this  file)
Logs
log var/log/httpd
How to start Service
systemctl start httpd
less httpd.conf
cd /var/www/html
vim index.html
systemctl status httpd
systemctl start httpd
ip addr
systemctl status firewalld.service
systemctl stop firewalld.service